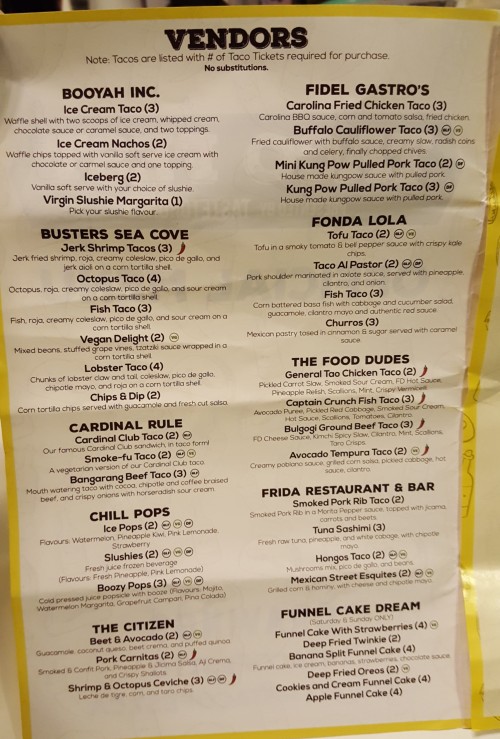
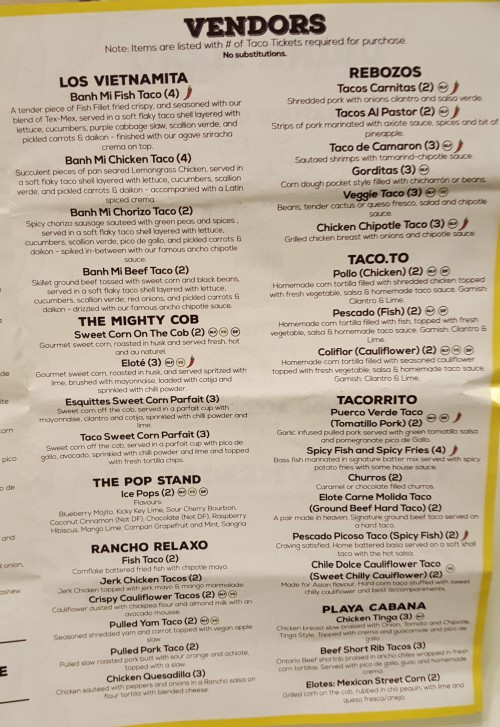
• Review | Revlon Mega Multiplier Mascara

    Hi Everyone!

    I received a complimentary VoxBox from Influenster Canada with the Revlon Mega Multiplier Mascara in Blackened Brown (803)!

    I prefer using the darkest shade of mascara that they offer. So I would get the black or blackest black mascara from this line. A few times when I looked in the mirror, it almost looked like I had powder on my lashes or in certain lighting, my lashes looked gray because the blackened brown shade is too light for me. This is my first time using a Revlon mascara, but right away I liked the fact that it wasn’t a silicone brush and I liked the shapes of the mascara tube and the brush.

    The mascara tube is sort of almond shaped, so it’s easy to open (unlike the round ones which can be hard to grip). The top part with the wand is shiny while the bottom part is a matte black and feels a bit textured.

    My lashes look natural and there are no clumps. I like slightly tapered brushes that aren’t silicone for my top lashes. This is a great brush and I would definitely keep it to apply other mascaras. Since this is a (fiber) mascara that coats your lashes with tubes, I can definitely feel that there is something on my lashes.

    I prefer non-fiber mascaras for my everyday makeup look, but the fiber ones are good for some extra oomph for a night out.

    Are the claims true? Let’s see!

    Flake-free? I ran my finger along my lashes and no flakes or residue on my finger! (It does flake if you rub your eye, but if unprovoked, it shouldn’t flake just from blinking)

    Smudge-proof? I rubbed my eye and nothing smudged, although a few fiber flakes came off on my finger.

    Water Resistant? It doesn’t claim to be waterproof, but if you get caught outside when it starts raining lightly, you should be okay. As long as it’s dry, it won’t smudge if you use a setting spray. I splashed some cold water on my face and squeezed my eyes shut to see if any mascara would come off, it didn’t smudge. I splashed some more on my face and this time it smudged a bit, but easily came off with a qtip.

    Removes easily with warm water? No eye makeup remover needed! Using warm water, it came off with little effort and unlike other mascaras, I didn’t get raccoon eyes trying to wash it off. I would avoid hot tubs or anywhere with steam.

    Plump and extend lashes for mega volume and extreme length? My lashes aren’t very long to begin with, but I can definitely tell that this mascara has added length and volume. Would I say MEGA volume and EXTREME length? No, but it’s definitely noticeable (the only way I will have long enough lashes to be noticeable in pics is if I wear false lashes).

    RATING: 5/5

    I give it a perfect score because it’s easy to take off and I love the brush. I just need to buy the darkest shade and I will love it even more!

    Thoughts: I really like this mascara! I like that it doesn’t flake and that you don’t need to use makeup remover to get it all off (I hate when I thought I took off all of my mascara and then after a shower, I find that I have raccoon eyes!)

    I always like to have a mix of high-end and drugstore products. I prefer to spend more on the skincare products like primers, moisturizers, toners, foundations and concealers. Since mascara can dry out fairly quickly and you’re not supposed to keep them for too long, I prefer to buy drugstore brands for mascaras. I tend to like drugstore brand mascara more anyways and this way I can buy a few for the same price as one designer brand. I only have high end mascaras because they were deluxe samples or a birthday present. Two of my favourite mascara brands are Maybelline and L’Oreal and it looks like I’ve just added Revlon to the mix!

    What are your fave brands of mascara? Do you prefer high-end or drugstore brand mascaras?

    Thanks to Influenster Canada for sending me this Revlon VoxBox!

    Have a great weekend!

    Love,

    jen

    Save

  • Using a Silicone Sponge to Apply Face Masks

    Hi Everyone!

    In the past year, I started using a flat foundation brush to apply my face masks. Before then, I always used to use my hands, which wasted a lot of product. Also, if your face mask comes in a pot, it’s less hygienic to stick your fingers in the pot to scoop some up (most of my face masks come in tubes anyway though). Using a brush is better in multiple ways because you use less product, it’s more hygienic and it applies the mask more evenly. The only drawback is that I find it hard to clean the brush after, especially if it was a clay face mask, it takes a bit more effort to make sure the bristles are all clean on the inside.

    A few months back, I bought a set of 2 silicone sponges from Amazon after seeing a lot of reviews about them to apply foundation. So I thought I’d try them out, but I like beauty blenders/sponges and brushes better than the silicone sponge. I found that silisponges don’t blend as nicely as a beauty sponge or brush. So, I thought, great, now I have two that I probably won’t use, but then I had an epiphany! The silisponge would be good for applying face masks because it will apply a nice even layer and it will be super easy to clean after! I just tried it with my L’Oreal Exfoliate & Refining Red Algae Clay Mask and it’s 100 times easier to clean than a foundation brush.

    Have you tried silisponges? Do you like using them to apply foundation?

    Love,

    jen

    Save

  • How to Make Milk Tea with Grass Jelly

    Hi Everyone!20170620_130927.jpg

    I don’t know about you, but I love bubble tea: slushies, green tea, black tea and milk teas. A while ago, I tried making my own milk tea with grass jelly using Red Rose Orange Pekoe tea, but it didn’t have the right taste in my opinion. So I tried making milk tea with grass jelly using Dollar Tea Club’s Assam Organic Black Tea. I used carnation milk, but you can use soy milk, almond milk or any other milk of your choosing. I think almond milk would give it a nice nutty flavour, like the drink they offer at Chatime.

    There’s no real recipe, it depends if you like your tea stronger or more milk, but here’s what I put in mine:

    Bring water to a boil and steep the black tea for at least 5 minutes (either add more than usual or steep it for a bit longer than usual so that it’s stronger). Add some brown sugar, I put a teaspoon, you can add more or less depending on how sweet you like it.

    Once steeped, you can add ice to the tea, but I prefer to put my mug into an ice bath so that I don’t water down the tea more than I need to. If you’re going to do an ice bath, get a shallow bowl and put your mug of black tea into it. Then, carefully pour cold water and ice into the bowl. Let the tea sit until it’s cooled down. Add your carnation milk to the black tea (if you like your tea weak, add more). I had a 500mL mug of black tea, so I put about 1/4 cup (give or take) of carnation milk.

    I poured my tea into a mason jar and chilled it overnight. If you add ice to your tea, you can drink it right away. For the grass jelly, open a can of grass jelly and rinse it with cold water. I put the grass jelly into a glass container so I could rinse it more easily and cut it up. Spoon out the grass jelly into a cup and pour the milk tea into the glass and VOILA!  (To save myself from having to wash a cup, I just carefully spooned out the grass jelly into the mason jar cup that already had my milk tea in it). You’ve made milk tea!

    Love,

    jen

  • Taco Fest Toronto 2017

    Hi Everyone!

    I hope you’re having a nice weekend and Happy Father’s Day! Yesterday, I went to Taco Fest Toronto (located at Ontario Place) with my friends.  Here are my thoughts on going to food festivals and the food:

    Food Festivals

    First of all, I think food festivals are a nice thing to try with friends, but it’s quite expensive because you have to pay to get in ($10 for a ticket). You choose a 2-hour window when you have to enter, and you can stay as long as you want once you’re in. Once you leave, you can’t go back in. You pay for food and drink tickets once you’ve passed security and check-in. Plus, if you add the subway and streetcar rides to get there and back, that’s another $6 (if you’re using tokens, $6.50 for cash). So, you’ve already paid almost $20 just to get in the festival and to make it worth it, you buy a few strips of tickets to try at least 3 or 4 tacos and a drink. I paid $30 for 15 tickets and most of the tacos that appealed to me were obviously the tacos that were worth 3 or 4 tickets (so I got a booze popsicle, 4 tacos and a bottle of water for 15 tickets). The one good thing about food festivals is that the vendors are all in one spot so you can try them all and know which ones you would go visit their restaurant or food truck.

    It was a fun experience with delicious food, but I probably wouldn’t go to another food fest. I think you could easily have a mini food fest with your friends by finding restaurants that are in close proximity and sharing a meal from several restaurants.

    The Tacos

    IMG-20170617-WA0017IMG-20170617-WA0019IMG-20170617-WA0022

    Sav

    There were 24 vendors at the Taco Fest (2 popsicle/slushie drink stands, 2 dessert stands, 1 corn on the cob stand and the rest were taco vendors). Amongst the three of us, we tried 12 different vendors. The servings were pretty good (especially the Mexican Poutine, they sold out at around 5pm, I don’t know if they restocked for the evening crowd). Despite the good portions, it was still quite expensive to pay the equivalent of about $4-6 for one taco.

    What I tried:

    Avocado Tempura Taco from The Food Dudes

    Avocado Tempura Taco from The Food Dudes – creamy poblano sauce, grilled corn salsa, pickled cabbage, hot sauce, cilantro (I asked for no hot sauce because I can’t handle too spicy. I’m sure the hot sauce gives it extra flavour, but it was delicious even without it) 

    Watermelon Margarita Boozy Pop from Chill Pops

    Fish Taco from Buster’s Sea Cove

    Fish Taco from Buster’s Sea Cove – fish, roja, creamy coleslaw, pico de gallo, and sour cream on a corn tortilla shell

    Beef Short Ribs Taco from Playa Cabana

    Beef Short Ribs Taco from Playa Cabana – Ontario beef shortrib braised in ancho chiles wrapped in fresh corn tortillas. Served with pico de gallo, guac and homemade crema

    Carolina Fried Chicken Taco (rated #1 in 2016) from Fidel Gastro’s – Carolina BBQ sauce, corn and tomato salsa, fried chicken

    I can honestly say that I would get all four tacos again. It’s hard to choose a fave but I think I liked the beef short ribs the best (I love my beef/steak). The battered fish from Buster’s Sea Cove was good, but there wasn’t a lot of toppings. The fried chicken from Fidel Gastro’s was yummy and the Avocado Tempura taco would be a good vegetarian choice.

    My friends tried other things:

    Bulgogi Ground Beef Taco from The Food Dudes

    Bulgogi Ground Beef Taco from The Food Dudes- FD cheese sauce, kimchi spicy slaw, cilantro, mint, scallions, taro crisps

    Mexican Poutine from Heirloom

    Mexican Poutine from Heirloom– crispy potato, local cheese curds, pickled jalapeno, chipotle and lime aioli and cilantro

    Lobster Taco from Buster’s Sea Cove

    Lobster Taco from Buster’s Sea Cove – chunks of lobster claw and tail, coleslaw, pico de gallo, chipotle mayo, and roja on a corn tortilla shell

    Tuna Sashimi Taco from Frida Restaurant & Bar

    Tuna Sashimi Taco from Frida Restaurant & Bar – fresh raw tuna, pineapple, and white cabbage with chipotle mayo

    Shrimp Ceviche Taco from Little Fin

    Shrimp Ceviche Taco from Little Fin – citrus-y Wild Northern Pink Shrimp, avocado, tomato, and srirach a-lime aioli

    Banh Mi Chorizo Taco from Los Vietnamita

    Banh Mi Chorizo Taco from Los Vietnamita – spicy chorizo sausage sauteed with green peas and spices, served in a soft flaky taco shell layered with lettuce, cucumbers, scallion verde, pico de gallo, and pickled carrots and daikon- spiked in-between with our famous ancho chipotle sauce

    Pollo (Chicken) Taco from Taco.TO (not pictured, forgot to take a pic)- homemade corn tortilla filled with shredded chicken topped with fresh vegetables, salsa and homemade taco sauce. Garnish: cilantro and lim

    Yummy Mango Lassi from Kathi Roll Express- mango and yogurt smoothie

    Mango Lime Ice Pop from The Pop Stand

    Both of my friends liked the lobster roll and would get it again. A favourite was the Bulgogi Ground Beef Taco from The Food Dudes. Both of them have gone to a few food fests: Brunch Fest and Mac & Cheese Fest. They both liked the taco fest.

    We didn’t get any of the desserts (they had funnel cake and ice cream) or corn on the cob because you can get those at any fair .

    Where do you get your tacos and what are your faves?

    Enjoy the rest of your weekend!

    Love,

    jen

  • Make Your Own Trail Mix

    Hi Everyone!

    I’m trying to eat a little healthier when it comes to snacks and the Nature Box trail mix was one of my faves, but it’s too expensive so I thought I’d make my own trail mix!

    It’s so simple once you know what you like. I really liked the yogurt covered apricots on the Probiotic mix from Nature Box and still have yet to find a bulk store that sells yogurt covered fruit that I like. A lot of the yogurt-covered fruit out there is coated with a candy coating, I don’t like this because it tastes more preserved than just yogurt-covered. Also, I’m sure there’s more sugar in the coated kind. So, I’ve found an alternative until I can find ones that I like: Yupik yogurt chips! I bought a 1kg bag from Amazon.ca, you can order from Yupik, but I thought it would arrive faster if I went through Amazon. Yupik also offers Greek yogurt chips (which are a little more expensive).

    So, here’s what I put in my trail mix:

    • Yupik yogurt chips
    • roasted, unsalted almonds
    • roasted, unsalted cashews
    • roasted, salted cashews
    • roasted, unsalted sunflower seeds
    • Craisins original dried cranberries

    I poured all of the ingredients in a bag and shook it up. I didn’t use specific measurements, just eyeballed what I thought was a good ratio. Since the sunflower seeds and the yogurt chips are smaller, you’ll have to put more of them in. I also found that they both settled to the bottom of the bag, so make sure you shake it up before pouring some out. I didn’t want to put only salted cashews so I did half and half just to add some saltiness to the sweet yogurt chips.

    What do you put in your trail mix?

    Love,

    jen

  • amazon fashion haul

    I Bought Two Skirts from Amazon

    Hi Everyone!

    I bought two skirts from Amazon.ca and it wasn’t a disaster! I’m not talking about the brand name clothes like Adrianna Papell or Calvin Klein on Amazon, I bought two skirts that were shipped from Asia. To my surprise, both were well made and looked exactly like the pictures.

    Buying clothes from any store online is a gamble because you may not know what size you are. Even though there is a sizing chart to help you figure out what size you are, you could be between sizes or the measurements are off. I’ve ordered several pairs of ankle pants from different stores, but none of the pants have fit nicely and I had to return them to the stores. Luckily, I chose stores that I can easily return the pants: Old Navy, Hudson’s Bay and Abercrombie & Fitch. Unless you know exactly what size you are, it’s best to try them on in-store first if you plan to buy them online (if anyone else is a sucker for ebates, like me, you know that you can get some cash back if you order online and now they offer in-store ebates too…yay!).

    For both skirts I ordered on Amazon.ca, I wish they came in an XS because I think that would fit me better, but given the dimensions in the size chart, I knew they might be a bit big. They both fit at my hips, but based on the pictures for both skirts, they’re supposed to sit a little higher. I wanted to find a midi pleated skirt, but didn’t have any luck with finding one that I liked or was the price I was willing to pay. So, I bought a ponte midi full skater skirt by Star Vixen in black, size small and a flowy maxi skirt with a side slit by Urban CoCo in black, also size small. They no longer offer the Urban CoCo skirt I got in black, but they still have red and some sizes in a teal colour that they call blue. Both skirts were about $40 with tax. I liked that the Star Vixen skirt had free returns because I wasn’t sure if it would be too hippy, but it turned out fine.

    The Star Vixen skirt is very thick and made in USA. Even though the description says its ponte, I wasn’t sure if it would be exactly as described. Ponte knit is a thicker fabric than jersey. This skirt will be great for fall, paired with some pointed toe pumps, I personally love the look of the skirt with my blue pumps by Louise et Cie.

    20170523_1054413.pngI was expecting the flowy skirt to be a chiffon-looking material, but it has a bit of a sheen to it, which I think makes it more of a night-time, party skirt than a typical maxi skirt that you could wear everyday or to a daytime party. I have an H&M maxi skirt with side slits on both sides that would work at a party because it’s chiffon. The flowy maxi skirt is very long, and since it should go higher up, I adjusted it by folding the waist at the back and sewing together. There’s a part that overlaps now and sort of creates a pleat at the top, but since the skirt is so flowy, you can’t tell it’s been altered unless you look really closely. The zipper is a bit harder to zip up now since there’s more material near it, but I didn’t want to pay to get the skirt taken in or have the length altered professionally. Before I altered it, the skirt would stop just above my hips, but since the material is so thin, the waist wouldn’t lie flat against my body. I think the zipper is almost too heavy for the material, so the part of the skirt with the zipper would sort of stick out.

    Both skirts would look good with a Portofino shirt from Express, or any button up shirt that’s a chiffon material or a loose-fitting tank that can create a blouson dress look (where the dress has an elastic waist or belt and then the material above hangs over the waist).

    Love,

    jen

    Save

  • Trying the New Rider Special at SPINCO

    Hi Everyone!

    This is my experience specifically with SPINCO, if you want to know about what to expect, wear and/or bring to your first spin class, read my other blog post: Things to Know Before Your First Spin Class.

    I am definitely not an expert on spin class (barely even a novice) and if you’re planning on trying out spin classes, I would definitely recommend it, if you live in a city where they have it, try Spin Co. I found it useful to read about other people’s experiences and tips/tricks on what to expect before attending your first spin class.

    I went to spin class for two weeks with my friends and I actually enjoyed it. We went with SPINCO because they have a New Rider Special- $50 CAD for two weeks unlimited. Yesterday was our last class, and here was my experience trying spin class:

    logoSPINCO promotes the idea of ONE TEAM, ONE BIKE. You move together with the music. Working out in a group definitely motivates you to work harder. If you’re someone who doesn’t work out a lot, like me, it’s hard to push yourself when you’re working out at home by yourself. In spin class, everyone is pushing themselves to work their hardest which makes you do your best too.

    They have a website and an app (Apple and Android) where you can register and sign up for classes on your phone. You sign up for a class and reserve a bike, so if you go with friends, you can sit together! SPINCO turns down the light once you get started. So, if you’re a bit shy working out in a group or it’s your first time, SPINCO is definitely a good option. I definitely wouldn’t feel comfortable working out under bright lights or in a glass room.

    SPINCO provides towel service, cycling shoes, lockers (these have locks on them, so you don’t need to bring one), and they have showers as well. They have two showers in the women’s bathroom, and I would assume two in the men’s as well.

    For those who are unfamiliar (like I was when I was first researching spin classes), cycling shoes are special shoes that have cleats so that you can lock into your bike to secure your feet to the pedals and allows for a more efficient movement as you pedal. It also reduces strain and foot discomfort, as well as improving stability.

    I went for a total of 7 days in our unlimited two week span. We went to five different instructors classes. I didn’t have a favourite, but obviously they all had different styles and music. When you’re starting out, I would suggest attending a mix of night and morning classes on different days to see which you like best. As a night owl, I preferred the night classes. Also, it will help you figure out which instructor you like best; some focus more on endurance and the climb, while others focus on the pumps and dips.

    After our last class, we rewarded ourselves by going to get Poke Bowls for dinner. At one point, our instructor said to focus on something to work towards; we were all focusing on our Poke Bowls.

    Friend’s experience from spin class: I would definitely do it again. It was fun that each instructor was so different. I liked a mix of morning and night classes but it was hard getting motivated right after work for the 5:30 class.

    Friend’s experience from spin class: I only have positive experiences at spin class. I would definitely go back; I’m just deciding which pass I want to get. I always felt good after leaving class and even if I was really tired when we got there, I left class with more energy than I went in.

    My experience from spin class: It was a really great experience to do with my friends. You feel closer to your friends trying something new together. Back in high school, we would walk to school together and eat lunch together every day and during university, with all of us in different cities, we only got together every few months. Even after university when we were all in the same city again, we would continue to only get together every other month or so, because of work and such. It almost felt like high school again, seeing each other so often. I’m not sure if I would have ever tried spin class on my own. But seeing my friends, cycling at my side, made me feel more comfortable. It’s intimidating seeing the people in front of you, who keep up with the beat and the instructor’s pace. All the other people in the room, you don’t know who’s a regular spinner or who’s a first-time or second-time spinner. So, knowing that your friends are the same exercise level as you, it’s less intimidating. You still try your hardest, but you might not be cycling as fast as the person in front of you.

    I was expecting my thighs and calves to hurt after each class, but to my surprise, my arms and shoulders were in the most pain the next day,  I guess because I walk to places a lot, and I don’t do any weights so the most my arms and shoulders usually do are carrying my purse.

    I do feel like my legs have gotten stronger, I should’ve measured them before we started, but I definitely feel like my thighs and arms have gotten stronger, and possibly my core. I think spin class is a great way to get you motivated to start exercising. I’m going to do my best to continue exercising regularly with weights and the elliptical that I have at home. Given that spin classes are quite expensive, I don’t think I will continue at this time, especially since I have an elliptical. But I would definitely continue spin classes if they were more affordable, maybe we’ll try a new place with a beginner package.

    I definitely recommend giving spin class a try!

    Love,

    jen

    Save

    Save

    Save

  • Things to Know Before Your First Spin Class

    Hi Everyone!

    I tried spin classes this month for a two week period with my friends. We went for a total of 7 days. Everyone’s experience with spin class is different: some people hate it, some people love it and there are people like me who will give anything a try once (within reason). If you’re anything like me, you will read a few articles and posts about what to expect, what to wear and bring to your first class.

    As someone who hasn’t regularly exercised in the past, I actually enjoyed it. I had a positive experience with spin classes and I don’t know if it was mostly due to the instructors or I just enjoyed the camaraderie with my friends and the rest of the class. When KN and BM asked if I wanted to try spin class with them, my first thought was, “OMG, I’m going to die!” Then I found out that classes are 50 minutes long…cue panic mode and thoughts like “I can’t cycle for that long!” “I haven’t exercised in over a year!” “I’m going to fall off the bike…what if I pass out?!” After that initial thought process, I agreed and said I’d try it with them. We went to Spin Co, read about my experience with them here!

    Below are some things that I think are useful to know before your first spin class:

    What to Expect/How to Prepare:

    • Arrive early
      • you’re expected to arrive 15 minutes early so that you can sign in, get your shoes and do whatever you have to do before spin class starts
    • Bring a positive attitude and do your best
      • You don’t have to cycle as fast as the instructor or the person next to you
      • try your hardest, but know your limits
        • don’t push yourself too hard if it’s your first time, you don’t want to pass out!
      • you don’t have to turn that resistance knob all the way, just do half turns until you’re ready for more
      • if you can’t get out of the saddle each time or do everything the instructor does, then just spin (before my first class, I considered it would be a victory if I just kept my legs moving the whole time. To my surprise, I was able to do everything the instructor did. I wasn’t as fast obviously, but I was proud of myself for pushing myself)
    • Prepare for an intense full-body workout!
      • One thing I didn’t expect was how much we’d work on the upper body (I know it says full body workout, but I wasn’t expecting how much)
        • you do pumps, dips, work the core by moving your hips back by hovering over the saddle
        • you also do weights at the halfway point (while still cycling)
    • Don’t base your experience after going just once
      • go at least twice to see if you like or hate it

     What to bring:

    • Water, water, water!
      • I would suggest a water bottle that has a spout like this CamelBak one so that you don’t spill71qfgo8iDEL._SY679_.jpg
    • Towel (unless they provide towel service)
    • Granola bar, trail mix, protein bar for after
    • combination lock (just in case)

    What to Wear:

    • Leggings or bike/athletic shorts
      • don’t wear any flared athletic pants, you might get caught as you cycle
    • Sports bra
    • Athletic top or t-shirt that’s breathable
      • don’t wear anything too long or loose (the longest shirt I wore was something that just covered my butt)
    • athletic socks
    • hair ties/hair band or clips

    If you plan to go to spin class regularly, it’s worth investing in at least one sports bra and a pair of leggings from a better quality brand because they obviously wick moisture much better than cheaper brands.

    Make sure you aren’t holding your breath. Focus on breathing normally.

    I’m not going to lie; it’s been a while since I’ve exercised, so I think it was a bit of shock to my system when I went to the first class. I also realized I was breathing weirdly. Usually I breathe through my nose, but for some reason I was breathing through my mouth and it made my throat feel dry and also my ears popped. I looked it up and it said your ears can pop if you’re holding your breath. I didn’t think I was holding my breath, but I guess I was. On the way home after the first class, it was hard to talk because it sounded muffled. The second time we went, I focused on breathing through my nose and made sure I wasn’t holding my breath, and my ears didn’t pop.

    Don’t wear makeup!

    I don’t usually leave the house without putting makeup on. I don’t always have a full face of makeup, but I at least wear powder or bb cream. I always have makeup on to cover up redness from acne. This is the first time in a long time where my skin has been clear enough for me to go out in public with a bare face. I read about wearing makeup to workout and it said whatever you do, don’t wear foundation! Wearing makeup while working out is bad for your skin because the foundation or powder risks blocking the pores and your skin needs to be able to breath while you sweat. Your pores enlarge when you sweat which means your makeup will absorb into your skin which increases the likelihood of a breakout. Only wear makeup if you absolutely have to, and keep it to a minimum. Remember, you’re there to make yourself feel better, not to impress others. I know most girls aren’t wearing makeup to impress others, you’re wearing it to improve your own confidence and feel better, but it doesn’t do you any favours to wear makeup during a sweaty workout and then breakout because of it.

    Don’t forget to have fun and do your best!

    Love,

    jen

    Save

    Save

    Save

    Save