Today, I’m reviewing the WetBrush Speed Dry Brush. I bought this in January, so I’ve been using it a few months. Here are my thoughts on the hair brush!
Upgrade your styling routine and protect your hair from damage with the game-changing Wet Brush® Speed Dry® Brush. Its vented design allows for air to pass through the brush, expediting your drying time and lessening your hair’s exposure to heat. HeatFlex® bristles flex as you style, preventing pulling or snagging strands and protecting against breakage.
Vented design removes excess moisture and speeds drying time
HeatFlex® heat-resistant bristles gently detangle while blow-drying
I bought the hair brush on Amazon.ca (not an affiliate link). The handle is a good size, not too wide. This brush is great, it’s so much easier to clean than the paddle brush I was using before. I never liked how my paddle brushes would get water in them when I cleaned them. Usually I just get whatever is on sale at the drugstore, but after seeing RachhLoves mention it on her channel, I decided to try it. I’ve accidentally dropped it a few times while using it (so it’s dropped about 5 ft) and it hasn’t cracked or broken a bristle. It’s easy to clean and dry off. With my old paddle brushes, I would have to dry them out, bristle side down, to make sure the water drained out properly.
RATING: 5/5
I also still love the Tangle Teezer brushes (read my review), but I don’t use them while drying my hair. Before getting the Tangle Teezer brushes, I bought one from Claire’s (an accessory store) and it melted into my hair when I was blow drying it.
Today, I’ll be reviewing the Grace & Stella Dr. Pedicure Foot Exfoliating Mask. They are currently a lot cheaper on Amazon.ca than what I purchased it for in December. I think they have new packaging, so they’re probably just trying to get rid of the old stock. A few years ago, I was sent one to try. It worked so well that I decided to buy another one. You may have read my review on the Tony Moly one. If not, you can read my review).
Dr. Pedicure is an innovative foot care product that will unbelievably shed the old, dead, callused skin right off your feet. Made with the exact same 17 vegetable extracts to this day and promises to deliver the same kind of jaw-dropping results. Tired of having rough, dull feet? Reveal your feet’s youth with Dr. Pedicure.
Includes 1 pair of our Dr. Pedicure Foot Booties & 2 pieces of tape.
Regular booties fit up to size 13 US Men. Original XL fits up to size 16 US Men.
There are warnings to consult your doctor before use if you are pregnant, nursing or diabetic. Also, do not use if you have any open sores or cuts on your feet.
Treatment
So, you put these plastic booties on for an hour. The booties have an inner lining that’s soaked in liquid/gel that contain AHAs. The instructions tell you to put the booties on and then put socks over them. Apparently the added heat will speed up the process. Once you have them on, remain seated while keeping your feet on the ground or parallel to the ground. You want the liquid to get the whole sole of your foot, so if you your feet up, the liquid will pool to your heels. I like to keep a hand towel beside me just in case.
After the hour is up, you take off the booties and wash your feet with soap and water. After you’ve washed your feet, they may look a bit pale. Not to worry, they’ll go back to your normal colour after a bit. It says the peeling will start in 6-10 days.
Post-Treatment
After 5 days, between my toes were starting to peel and my heels looked like they were cracking. The next day, the pads of my toes and heels were peeling. It looked like I had blisters on my toes.
It was a bit uncomfortable for me once the peeling started because my feet felt really dry. I read somewhere that it’s best not to put lotion on your feet because it can interfere with the peeling process. If you absolutely must, use an oil-free moisturizer. The soles and sides of your feet will peel the most since that’s where most of the liquid is when you’re wearing the booties (gravity, duh!). The tops of my feet just look dry and flaky instead of peeling.
I like wearing socks once my feet start to peel so I’m not shedding dead skin everywhere. Ankle socks are easiest for me. Just make sure to put any socks on slowly and carefully. When I take my socks off, I do it over the garbage can as I turn them inside out to shake out the dead skin.
It’s very tempting to scrub or rub your feet (especially when you’re in the shower and your feet are wet), but don’t do it! After showering, gently pat dry. Also don’t pull off the dead skin. If it’s hanging off your foot and annoying you, carefully cut with cuticle cutters.
Hopefully by the end of this ordeal, your feet will be nice and smooth! My feet aren’t super calloused or bad to begin with, so I don’t know how well it works on someone who has really rough heels/feet.
If you decide to try a foot peeling mask, a few things to consider:
I think the best time to do the treatment is when it starts getting warmer (right before sandal weather) because you won’t want to wear sandals while your skin is peeling
The dead skin will stick to fluffy socks, so I like to wear regular ankle socks made of cotton
If you want to see the gross, but satisfying pictures on the 7th day, click the arrows below in my IG post.
The peeling is a bit of an inconvenience and the dryness is a bit uncomfortable, but it does work (for me). If you plan to do this before a special event, I would try it in advance to see how long it takes your feet to start peeling. Then, you can do it again before your special event (maybe add a few extra days just in case).
Have you tried a foot peeling mask? If you haven’t, would you try one?
Today, I’m sharing what I do to clean my makeup brushes! I use a few different products: I have brush cleaner for a quick clean and then I also use a solid brush cleaner and a mat to get a deeper clean.
For aquick clean, I’ve been using a brush cleaner. I have the Sephora one and the Cinema Secrets one. The Sephora one used to smell really nice, but it’s been a few years since I bought it and it just smells like cleaner now. The Cinema Secrets one has a vanilla scent which I like a lot more.
For a deeper clean, I’ve been using the Sephora mini solid brush cleaner. Since I have the mini one, it doesn’t come in a tin, so I keep it in a little soy sauce bowl. I wet the brush and lightly swirl the brushes on the ‘soap’ until there’s no longer any colour coming off of brush. In the past, I’ve used baby shampoo and a mat from Amazon to make sure the inside is nice and clean. The mat has ridges so it gets inside the bristles without ruining your brushes. Either I lightly swirl the brush or wipe it back and forth against the ridges.
To dry my brushes, I use a brush drying rack. I also like drying my brushes with my makeup drying tool (read my review) I got from Winners that spins the brushes to dry them faster and then I hang them on my drying rack until they’re fully dry. The drying tool sounds a bit gimmicky, but it does dry brushes really fast! The only problem with the drying tool – it doesn’t fit brush handles that aren’t tapered (like my Sephora or Sigma eye brushes). I have to stuff them into a smaller size or I just let those air dry.
Today, I’m doing a first impressions review of a brand called Purify Soap Co. They reached out to me on Instagram for an honest review and they sent me their Kisameet Clay Balm and Soap Bar. Keep reading to hear my thoughts on these two products!
Mineral Clay Balm
I tried the balm first and I was unsure of how I would like it because it does smell like clay. I put it on my lips and luckily, I couldn’t smell it after I applied it. It felt very moisturizing and kept my lips nourished for a few hours. Let’s move on to the soap bar before I tell you my rating…
Cleansing Soap
Lather in your hands and apply to your face and body (or you can lather directly onto your face and body for more exfoliation), leave for 2 minutes. Wash off, avoiding contact with the eyes. Now, it’s your skin’s time to shine!
The soap bar smells minty and as I lathered it on my skin, I could feel it exfoliating my arms. The next day, unfortunately, I woke up and my lips were a bit inflamed and I had a bit of a breakout on my arms. It’s been three days and the left side of my lip still looks a bit puffy. I must’ve had some sort of reaction to both products which is disappointing because one of the claims is to help with eczema.
I know that coloured bars of soap look pretty, but any soap bar that isn’t white just makes a mess of the sink and shower. Similar to a charcoal bar of soap I recently tried from Woodlot, this one ‘bled’ greenish-gray.
RATING: 2/5
Before I had the reaction, both products seemed very nice and might work for you. I haven’t quite figured out what it was that caused the reaction, but it’s safe to say that I can no longer use the balm. Since I have sensitive skin, I think that I had a very unusual reaction to something in both of the products. If the testimonials on their Instagram account have any truth to them, then it might work to help someone who has psoriasis or eczema. Even if this did work for me, it retails for $28 USD which I think is way too expensive for a bar of soap. As someone with eczema, I would rather just use my Cetaphil Gentle Daily Cleanser (for body and face).
A while back, I bought a silicone spatula that helps you get every last drop of your makeup products. I got the Every Drop Beauty Spatula on Amazon. When I got it, it was $11, now it’s $13.
It’s been amazing for getting ‘every last drop’ because it’s silicone, it scrapes the sides of the bottle well. I remember the first time I used a silicone spatula when I was baking and I was like OMG, I can make another cupcake with all of the batter I scraped off. Well, similar to baking, the spatula can probably get one or two more uses out of your products. Unfortunately some bottles just aren’t shaped right to get all of it, there’s only so much you get angle the spatula to get the top part. It was easy to scrape off the Maybelline Fit Me foundation, but I could only go half way up on the NARS Sheer Glow foundation bottle.
Couldn’t reach a few spots, but look how clean!!
The triangular shape of the spatula is great for getting the top of a bottle. They also sell one that’s shaped like a scalpel (for $9), but that’s better for lip gloss or concealer tubes. The other end of the spatula is like a bulb, either can be used to mix any makeup product.
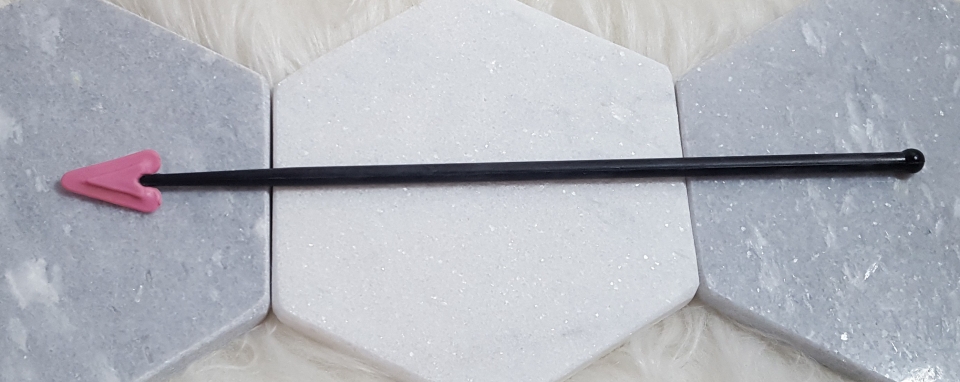
UPDATE: I was trying to get the last bit from a concealer tube and the plastic stopper was being stubborn and wouldn’t come off. I put the spatula in because similar to an arrow, it’s fine going in, but pulling it out, it catches on the sides. The silicone part came off the stick and now I no longer have the spatula any more. So, if you plan to purchase this, make sure the plastic stopper of your tubes can come off easily before sticking it into the tube.
RATING: 4/5
Although the price has gone up, I would definitely recommend getting one. You’ll save some money in the long run by scraping off that last little bit of your high-end foundation or concealer.
I’ve always seen 3-step fiber mascaras and one of my friends bought one off Amazon and her lashes looked amazing, so I thought I’d try it out myself. I’ve seen the fiber mascaras at the drugstore, I got mine from Amazon, but it’s no longer available. For unknown reasons, it’s no longer available on the brand’s website either. Most 3-step fiber mascaras retail for $15-20 CAD. I’ve seen one on sale at Rexall or Shoppers Drug Mart for $12.
In this post, I will be sharing my thoughts on whether 3-step mascaras in general are worth it, I won’t be reviewing the specific brand or mascara that I bought because let’s be honest, they’re all kind of the same- there aren’t any name brands that have 3-step mascaras out there.
Sealing Gel- Steps 1 & 3, Natural Fibers- Step 2
Step 1- Curl lashes and apply generous amount of the mascara
Step 2- Immediately apply natural fibers to lashes
Step 3- finish with a second coat of the mascara to seal the fibers to your lashes
For best results, do one eye at a time to prevent Step 1 from drying before fiber application.
To remove the mascara, you just use warm water and it comes off easily. Make sure not to open your eye until it’s completely off because the fibers can get into your eye.
RATING: 4/5
It does make my lashes look longer and fuller. To be honest, the sealing gel by itself makes my lashes longer. For me, I just think it takes too much time to do the 3 steps and I could do the same with a regular mascara or a fiber mascara like the Revlon Mega Multiplier Mascara (read my review). Also, I don’t like how you use the sealant after using the fibers because then the natural fibers get into the other tube.
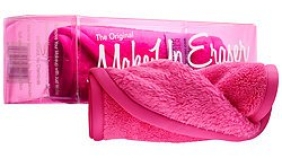
I recently bought the makeup eraser cloth from Amazon for $18.99 CAD. It’s a super soft reusable cloth that contains no chemicals- you just need to add warm water and it removes makeup. I watched a Buzzfeed video where the ladies tried it out and decided I wanted to try it out for myself. I bought mine on Amazon. I was too lazy to go out and get one at Sephora and I was making an order on Amazon anyway. I ordered the pink one, but they have black and blue ones too.
#1 reusable makeup removal system in the world. Erase all your makeup with The Original MakeUp Eraser and water! Erases all makeup including waterproof mascara, eyeliner, foundation, blush and more. The MakeUp Eraser is also reusable, machine washable and will last you 3-5 years.
I put on a full face of makeup including foundation, concealer, waterproof mascara, eyeshadow and some waterproof eyeliner from Sephora (the eyeliner I have is quite hard to wash off, even with makeup remover). So I ran the plush cloth under the tap and began wiping my makeup off. Like the ladies in the Buzzfeed video, I was surprised at how well it worked taking off my makeup. It did not remove the Sephora eyeliner and all my mascara, but everything else wiped off easily. It’s probably great for travel when you don’t want to bring too much makeup remover and don’t have too much eye makeup on. To clean the cloth after, I just used some soap and the makeup washed off and I threw it in the laundry with my clothes. For the darker eye makeup stains, I had to use a dab of makeup remover. For me, I think I will only use it when I’m just wearing foundation, concealer and light eye makeup because even though it removed some of the mascara, it didn’t get all of it off, so when I have dark makeup on my eyes, I would need to use makeup remover too.
RATING: 4.5/5
I give it a 4.5 because even though it claims to remove waterproof makeup, it requires a bit of rubbing and I’d rather just use the cloth to remove my face makeup and use eye remover makeup instead of rubbing at my eyes. It does cut down on the amount of makeup remover you need though. I love using the Clinique Sonic System Purifying Brush after using it because it removes the makeup that I missed with the cloth.