• brow gels

    Brow Pencils & Gels | My Hits & Misses

    Hi Everyone!

    Today, I’m sharing my favourite brow products!

    Check out my other Hits & Misses posts!

    MAKEUP || Primers | Foundations | Powders | Concealers | Mascara

    SKINCARE || Eye Creams

    BRANDS || Bobbi Brown | Burt’s Bees | L’OréalMaybelline | Nude by Nature | NYX | TULA | Volition Beauty

    Before you read this post, please remember that we all have difference preferences and skin types. These are MY hits, misses and likes. You might love something I don’t like or dislike something I love.


    My brow products of choice are pencils and gels. A few times I’ve used an matte shadow as eyebrow powder, but I prefer pencils. I’m not patient or skilled enough to use pomades.

    Two years ago, I wrote a similar post reviewing brow products I’ve tried (read my post). I’ve tried quite a few products since then and found some that I like more. 

    I’ve also written a few comparison posts (with swatches), check them out below:

    Lancôme Brow Shaping Powdery Pencil vs. Benefit Precisely, My Brow

    Dior Diorshow BoldBrow vs. Benefit 24 Hour Brow Setter Shaping & Setting Gel

    I don’t think they sell the Dior Diorshow BoldBrow anymore, they came out with a new product to replace it.

    HITS

    Colourpop Brow Boss Clear Gel – My friend recommended this clear gel and it’s my favourite clear gel that I’ve tried. It comes out of the tube white, but dries down clear. It leaves my brows feeling soft and not crunchy at all!

    Benefit Gimme Brow+ Volumizing Eyebrow Gel in 5 Deep – One of my favourite tinted brow gels.

    Benefit Precisely, My Brow Pencil Ultra Fine Shape & Define in 6 (read my review) – This has been one of my favourite brow pencils I’ve tried.

    NYX Micro Brow Pencil in Black – A great drugstore micro brow pencil. This is a fave of mine as well.

    LIKES

    Anastasia Clear Brow Gel – This brow gel does get a bit crunchy, but it keeps my brows in place. I just wish the wand wasn’t so huge. It’s like a mascara wand. I would prefer a thinner one.

    Lancôme Brow Shaping Powdery Pencil in Soft Black 09 (read my review) – I liked this brow pencil, but it felt like a waste to sharpen so much of it away. I prefer retractable pencils that you don’t have to sharpen. This pencil is nice for a natural look.

    Kevyn Aucoin The Precision Brow Pencil in Dark Brunette – I wanted to try a different brow pencil, so I grabbed this Kevyn Aucoin one. It’s the first product I’ve tried from the brand. The shade is a good match for me, but it wipes off more easily than other brow products. I wouldn’t repurchase it.

    NYX Fill & Fluff Pomade Pencil in Ash Brown – In my NYX Hits & Misses post, I put this in the HITS, but this is going into the LIKES section for this post. It’s a HIT for the products I’ve tried from NYX, but there’s other brow products I prefer. This is another pencil that I like from NYX. Although I prefer the Micro Brow pencil because it comes with a spoolie. This one comes with a little oval/paddle brush so you can diffuse what you drew on. You get a more filled in look with this pomade pencil.  

    Anastasiah Beverly Hills Clear Brow Gel

    MISSES

    Benefit 24-HR Brow Setter Shaping & Setting Gel (read my review) – I don’t know if it was just the sample I got of this, but it was kind of tacky. When you pull the wandout, you would see a string of product from the wand to the tube. It kind of reminded me of clear lash glue in that way.

    Benefit ka-BROW! Cream-Gel Eyebrow Color in 5 Deep – I got a deluxe sample of this and it’s just too intense for me.

    Benefit Goof Proof Brow Pencil Easy Shape & Fill in 5 Deep – I prefer micro pencils so this was too thick for me. I prefer hair-like strokes instead of the filled in look.

    Burt’s Bees Natural Brow Pencil in 1610 Brunette* – This only comes in two shades and the darker shade is too light for me. It was too waxy for my liking.

    Maybelline Eye Studio Brow Precise Shaping Pencil in Deep Brown – This pencil was way too waxy for my liking and it never sharpened nicely.

    Charlotte Tilbury Legendary Brows Eyebrow Gel in Perfect Brown – I just wanted to try some Charlotte Tilbury products so I bought this during the sale. I love the size of the brush and the colour was nice. It’s a nice product, but I don’t think it’s anything special and it’s the most expensive gel I’ve tried.

    Brow Pencils

    Brow Gels

    ProductPrice in CADSizeCost per gram # of shades available
    Colourpop Brow Boss Clear Gel7 USD = 8.85 CAD3.10g2.2clear, 4 tinted
    Anastasia Strong Hold Clear Brow Gel29.507.85g3.8clear
    L’Oréal Brow Stylist Boost & Set Volumizing Brow Mascara13.493.2g4.24 tinted
    Benefit 24-HR Brow Setter Shaping & Setting Gel327g4.6clear
    Anastasia Clear Brow Gel (mini)122,5g4.8clear
    Benefit 24-HR Brow Setter Shaping & Setting Gel (value)516g8.53 tinted
    Benefit Gimme Brow+ Volumizing Eyebrow Gel (mini)193.5g5.4clear
    Benefit Gimme Brow+ Volumizing Eyebrow Gel323g10.710 tinted
    Benefit Gimme Brow+ Volumizing Eyebrow Gel (mini)181.5g12.710 tinted
    Charlotte Tilbury Legendary Brows Eyebrow Gel301.33g22.64 tinted
    charlotte tilbury legendary brows

    Brow Pencils/Pomade Gels

    ProductPrice in CADSizeCost per ounce# of shades available
    Benefit ka-BROW! Cream Gel Eyebrow Color320.1oz3208 shades
    Burt's Bees Brow Pencil13.990.04oz3492 shades
    Mini size Benefit ka-BROW! Cream Gel Eyebrow Color190.05oz3803 shades
    Maybelline Eye Studio Brow Precise Shaping Pencil10.990.02oz5504 shades on Maybelline,
    2 shades on Shoppers Drug Mart site
    NYX Fill & Fluff Pomade Pencil12.490.007oz17848 shades
    Benefit Goof Proof Brow Pencil Easy Shape & Fill320.01oz320012 shades
    Benefit Goof Proof Brow Pencil Easy Shape & Fill (mini)190.005oz38003 shades
    NYX Micro Brow Pencil12.490.003oz41638 shades
    Anastasia Brow Wiz280.003oz933310 shades
    Kevyn Aucoin The Precision Brow Pencil320.003oz106674 shades
    Lancôme Brow Shaping Powdery Pencil350.003oz116679 shades
    Benefit Precisely, My Brow Pencil Ultra Fine Shape & Define320.02oz1600012 shades
    Benefit Precisely, My Brow Pencil Ultra Fine Shape & Define (mini)190.001oz1900012 shades

    To Try

    I have the Anastasia Brow Wiz in my collection, but I haven’t tried it yet. I bought it earlier this year and wanted to finish my Kevyn Aucoin pencil first.

    • Dior Diorshow Brow Styler Ultra-Fine Precision Brow Pencil
    • Dior Diorshow Pump ‘N’ Brow
    • Fenty Beauty Brow MVP Ultra Fine Brow Pencil & Styler
    • Hourglass Arch Brow Micro Sculpting Pencil
    • Hourglass Arch Brow Shaping Gel
    • Milk KUSH Fiber Brow Gel
    • Nudestix Eyebrow Stylus Pencil & Gel

    What are your fave brow products?

    Love,

    Products marked with (*) were sent to me.

  • laneige lip sleeping mask vs lip glowy balm

    This or That | Laneige Lip Sleeping Mask vs. Lip Glowy Balm

    Hi Everyone!

    Today, I’m comparing two Laneige products: Lip Sleeping Mask vs. Lip Glowy Balm. The lip sleeping mask came out first and it was the first lip mask I’ve tried. Then they came out with the Lip Glowy Balm which could be considered the travel-friendly, daytime version of the Lip Sleeping Mask. They do have some differences (not just the packaging). I received the Lip Glowy Balm from Laneige Canada and won the Lip Sleeping Mask in a giveaway, but I would’ve bought both on my own.

    Lip Sleeping Mask

    A leave-on lip mask that soothes and moisturizes for smoother, more supple lips overnight. Lip Sleeping Mask has a softening balm texture that closely adheres to lips for quick absorption. A generous layer of this soothing mask at bedtime helps reduce flakiness so you can wake up to lips that feel refreshed, supple, and soft to the touch.

    Lip Glowy Balm

    A lightweight, moisture-coating lip balm for hydrated, tinted, and kissable lips throughout the day. The perfect daytime partner in crime to the cult-favorite Lip Sleeping Mask, Glowy Lip Balm is pocket sized for easy, on-the-go application. The formula contains murumuru and shea butters that provide powerful hydration and lock in moisture longer.

    Lip Sleeping Mask

    $26 CAD (0.7oz/20g)

    Comes in a pot with a spatula, not as travel-friendly

    Available in Berry (Original), Vanilla, Apple Lime, Grapefruit, Mint Chocolate Chip (Limited Edition)

    Lip Glowy Balm

    $20 CAD (0.35oz/10g)

    Comes in a tube, easy to pop in your purse/pocket

    Available in Berry, Grapefruit, Pear, Peach

    I have the Berry Sleeping Mask and the Grapefruit Glowy Balm. So, I can’t say if the berry and grapefruit scents smell exactly the same. Before I got the Glowy Balm, I had worn the Sleeping Mask in the daytime. Looking at the specs, the Sleeping Mask is twice the size for only $6 more, but it’s too bulky to throw in your purse. After every use, I like to wipe down the spatula that came with the Sleeping Mask. The Glowy Balm is easy to apply straight from the tube.

    I’ve found that the Sleeping Mask doesn’t taste like anything (when I’ve licked my lips), but the Glowy Balm DOES taste like grapefruit. Since I don’t have the same flavour in both lip products, I can’t say if all glowy balms have a taste or all grapefruit ones have a taste. At some point, I might have to buy the Berry flavour in the Glowy Balm to see.

    WINNER: Lip Sleeping Mask

    I think I prefer the Lip Sleeping Mask over the Glowy Balm. I also prefer the Original Berry flavour over the Grapefruit. I can use the Sleeping Mask during the day or night, but I personally don’t want to use the Glowy Balm at night because it’s tinted and I don’t want it getting on my pillowcases or duvet cover. Also, the Sleeping Mask is more cost effective. It may not be as travel-friendly, but I have other lip products that I can throw in my purse.

    Which Laneige lip product do you prefer?

    Love,

  • almay make them jelly hi-lite illuminator vs nyx a bit jelly gel illuminator

    This or That | Almay Make Them Jelly Hi-Lite vs. NYX A Bit Jelly Gel Illuminator

    Hi Everyone!

    Today, I’m comparing two different jelly highlighters. These were both gifted to me and I thought I would do a review comparing the two. Jelly highlighters are interesting, but they’re not great for every day use since the shimmer is a bit chunky (for my liking). I would say this jelly is good for a festival/unicorn/halloween look. Keep reading to find out which one I prefer!

    Almay Make Them Jelly Hi-Lite in 24K Dreams

    This gorgeous jelly highlighter with an addictively bouncy texture gives your skin a dewy, holographic glow that’s utterly irresistible.

    There are 2 shades available.

    from left: 24K Dreams 004, Unicorn Light 003

    Both of these highlighters are fun shades – yellow gold and pink. Although once you apply it, it’s not as pink as it looks in the tub. It’s like a sheer, jelly glitter. I’m not a huge fan of this one because when I press my finger into it, the jelly breaks up and crumbles (for lack of a better word). I’ve noticed that the gold one has a firmer texture whereas the pink one tends to crumble more.

    NYX A Bit Jelly Gel Illuminator in Luminous

    Dip right into our new A Bit Jelly Gel Illuminator. Available in three shades swimming in sparkles, this jelly-like formula feels and looks seriously amazing. Just scoop some up with your finger and pat the water-based gel onto the face or body. It slips on like a dream as you smooth it onto the skin, leaving behind a lightweight wash of radiance—that glistens even after it dries down! Gettin’ a bit jelly right now? Same, this dewy glow is lit.

    There are 3 shades available

    From top: Opalescent, Bronze, Luminous

    I have the shade Luminous and it’s a champagne shade with blue glitter.  This highlighter is a water-based product which washes away easily with water (which makes me think it might just melt down your face if you sweat). I would suggest spraying any setting spray before applying this highlighter. The texture of it is nice – when I dip my finger into it, it doesn’t separate or become chunky. It’s almost like a putty because it moves with my finger which is a good thing because then you don’t get any jelly chunks on your face when you apply it.

    Luminous (top), 24K Dreams, Unicorn Light

    WINNER: NYX A Bit Jelly Gel Illuminator

    I think between these two jelly highlighters, I prefer the NYX A Bit Jelly Gel Illuminator. Both highlighters jiggle when you tap the containers. You can feel the jelly bounce back. I think jelly highlighters are fun, but I don’t think I would purchase any myself. I would consider trying jelly eyeshadows because I’ve seen a few on Instagram and they’re so pigmented. Obviously jelly highlighters wouldn’t be pigmented because you’d have a coloured streak on your face, but it feels like I’m just putting wet glitter on my face. I’m also not a fan of glittery highlighters and would prefer a liquid highlighter.

    Have you tried jelly products?

    Love,

  • Let’s Talk About Acne Patches!

    Hi Everyone!

    I’ve tried a handful of pimple patches, so here are my thoughts on them. I haven’t tried patches that have tea tree or microneedles. I have only ever tried the hydrocolloid patches that just absorb pus.

    I know there are so many brands out there, but unfortunately for me, I can’t get them in Canada without having to pay an arm and a leg. For me, I’ve found ones that work well, so I don’t really need to try all of them out there. 

    I’ve tried both tapered and non-tapered patches. The originals are ones that are the same thickness all around while the tapered ones are thinner around the edge so that it blends into the skin more easily. Tapered are great for wearing out of the house while non-tapered ones are great for overnight use and also can absorb more.

    Check out my reviews:

    COSRX Acne Pimple Master Patches | COSRX Clear Fit Master Patches

    COSRX vs. Rael | COSRX vs. Nexcare

    I have tried five different patches from four brands:

    Regular, non-tapered patches – COSRX Acne Pimple Master Patches, Nexcare Acne Absorbing Covers

    Tapered patches – COSRX Clear Fit Master Patch, Rael Acne Pimple Healing Patch and Subi Perfect Pimple Patch

    This picture is not mine, it was taken from Google.

    Nexcare acne absorbing covers are my least favourite patches I’ve tried. They smelled like plastic and both sides were quite sticky (sometimes I didn’t know which side was the sticky side). They were also more yellow than the other patches which made it more noticeable on my skin.

    COSRX Acne Pimple Master Patches are my favourites for overnight pimples.

    The tapered ones are the best for wearing out of the house and for spots that are curved. Sometimes the non-tapered ones are too thick to put on the jaw/chin or nose, so a tapered one won’t unstick from your skin.

    To me, the COSRX Clear Fit Master Patch, Rael Acne Pimple Healing Patch and Subi Perfect Pimple Patch are all the same in terms of efficacy. So, the deciding factor would be the price and whether you want one or two sizes.

    *All prices are in Canadian unless stated otherwise

    COSRX Acne Pimple Master Patches

    1 pack = 24 patches with 3 sizes (10x7mm, 5x10mm, 9x12mm)

    Amazon.ca – $15 for a 3 pack (72 patches) = 0.2083 per patch

    Chuusi.ca – $4.50 for 1 pack (24 patches) = 0.1875 per patch

    COSRX Clear Fit Master Patches

    1 pack = 18 patches with 1 size (18x10mm)

    Amazon.ca – $24 for a 3 pack (54 patches) = 0.44 per patch

    Chuusi.ca – $4.50 for 1 pack (18 patches) = 0.25 per patch

    Subi Beauty Perfect Pimple Patches

    1 pack = 18 patches with 1 size (18x10mm)

    Subi Beauty – $29.95 USD for a 3 pack (54 patches) = $0.55 USD per patch

    Rael Acne Pimple Healing Patches

    1 pack = 24 patches with 2 sizes (12x10mm, 12x12mm)

    Amazon.ca – $25.49 for a 4 pack (96 patches) = 0.27 per patch

    Nexcare Acne Absorbing Covers

    1 pack = 36 patches with 2 sizes (24x8mm, 12x12mm)

    Amazon.ca – $11.50 for a 1 pack (36 patches) = 0.32 per patch


    For me, as a Canadian, the COSRX Acne Pimple Master Patches are the cheapest from Chuusi.ca and the Clear Fit Patches are the cheapest tapered patches (also from Chuusi.ca).

    I do like the option of having two sizes from Rael, but if I’m already making an order on Chuusi.ca, I would buy the COSRX Clear Fit ones.

    What are your fave acne patches?

    Love,

  • elf Lip Exfoliator vs. Milani Keep It Sweet Sugar Scrub

    This Or That | elf Lip Exfoliator vs. Milani Keep It Sweet Sugar Scrub

    Hi Everyone!

    Today, I’m comparing Lip Scrubs: elf vs. Milani. I received the elf lip exfoliator from Topbox Circle and I purchased the Milani scrub in a haul last year. Both have sugar granules that help to exfoliate. The elf one is packaged like a bullet lipstick and the Milani one comes in a jar.

    elf Lip Exfoliator in Mint Maniac

    Gently exfoliate lips to remove dry, chapped skin with our Lip Exfoliator! A sweet sugar and smoothing sensation, infused with Vitamin E, Shea Butter, Avocado, Grape and Jojoba Oils to nourish and protect. This Lip Exfoliator treats and smoothes lips for a conditioned and revitalized feel.

    This exfoliator comes in different ‘flavours,’ I received Mint Maniac, but they also have Brown Sugar, Sweet Cherry, Coconut, Pink Grapefruit and Rose. I think I would’ve chosen the mint one anyway. I might’ve considered brown sugar, but to be honest, it looks kind of gross since it has specks of the brown sugar.

    Since the instructions say to use on moist lips, I prefer to use my finger to get some of the scrub and then use my finger to exfoliate instead using the tube. I think using my finger is a little more hygienic especially because my lips are a wet. After exfoliating, I can feel the slight tingle from the mint.

    Milani Keep It Sweet Sugar Lip Scrub

    Smoothes and exfoliates lips for an instant polished and revitalized look. Natural sugar granules soften skin with a kiss of sweetness, leaving lips feeling nourished and prepped for color. Use 2-3 times per week and follow with Keep It Smooth Luxe Lip Treatment for the ultimate lip luxury experience.

    Since this scrub comes in a pot, it’s a bit chunkier and the consistency is like a body sugar scrub. It has a sweet scent that’s not too overpowering.

    WINNER: elf Lip Exfoliator

    For the Milani scrub, my fingers feel greasy after using it- I guess it’s to help moisturize the lips after, but I don’t like the feeling. Personally, I think I prefer the elf one because of the way it’s packaged. Also, I felt like the elf one did a better job at sloughing off the dry skin and it feels gentler (the Milani lip scrub is more chunky and messier).

    What’s your fave lip scrub?

    Love,

    jen
  • real techniques miracle complexion sponge vs sephora total coverage sponge

    Dupe It Out | Real Techniques Miracle Complexion Sponge vs. Sephora Total Coverage Sponge

    Hi Everyone!

    I’m back with another Dupe It Out. It’s been a while since I’ve done one. Today’s duel: Real Techniques vs. Sephora! Recently, I purchased a 4-pack of the Real Techniques Miracle Complexion sponges at Winners for $20. I was already using the Sephora Total Coverage Sponge, so I thought I would compare the two. I know Sephora wasn’t the first to come out with a beauty sponge and the Real Techniques one isn’t a dupe for it, but they’re both makeup sponges and they have similar textures and density.

    real techniques sponge

    Real Techniques Miracle Complexion Sponge – If you pick up the sponge from the drugstore, this sponge could be $10 each, but if you pick it up at Winners, and get the 4-pack, it’s $5 each.

    This versatile beauty tool was designed with a revolutionary foam technology to evenly blend makeup for a smooth, enhanced finish. Use damp for a dewy glow or dry for a full coverage.

    • rounded sides blend large areas of the face with a dabbing motion
    • precision tip covers blemishes and imperfections
    • flat edge for contouring around the eyes and nose
    • ideal for liquid foundation
    • latex-free

    For best results, replace your makeup sponge every 1-3 months.

    sephora sponge

    Sephora Total Coverage Sponge – I bought the sponge that comes with the bar soap. Before buying this one, I had only bought ones from Winners that are $4-6.

    This sponge is specially designed to give makeup an expert boost. The wide base can cover the larger surfaces of the face, while the pointed tip is perfect for contouring around curves, and precision application around the nose, chin, and under the eyes. This sponge is intended to be used wet. The wetter the sponge, the more sheer the coverage. It is formulated without natural latex.

    real techniques vs sephora

    Both have the same feel and density (how squishy they are when wet). I’ve used some sponges that are denser and basically bounce off your face because they’re so hard. Most sponges I’ve picked up at Winners have the same feel and density (if you want a cheaper version of the Sephora one).

    I tested out both sponges with liquid and stick foundations and they both performed the same; blending the foundations beautifully. The only thing that sets them apart are the price, shape and size.

    WINNER: Real Techniques Miracle Complexion Sponge won for the following categories:

    • More budget-friendly
    • Faster blending because it’s bigger
    • Easier for baking because of the flat side
    • Better blending for stick foundations

    WINNER: Sephora Total Coverage Sponge won for the following categories:

    • Easier to blend under eyes because tip is smaller

    If I had to choose, Real Techniques would win. I can’t say if it would win against the beauty blender because I’ve never tried one (and I don’t really plan to spend $20+ on a sponge in the near future), but it wins in more categories than the Sephora sponge. If you like smaller sponges, I also saw another Real Techniques pack that had 2 of the regular orange ones, 3 mini ones and 1 pink one that’s shaped more like the Sephora one, but it also has a flat side too.

    ss.jpeg

    OVERALL WINNER: Real Techniques Miracle Complexion Sponge

    Which makeup sponge is your favourite?

    Love,

    jen

  • Bobbi Brown Skin Foundation Stick vs. Maybelline Fit Me Shine-Free + Balance Stick Foundation

    This or That | Bobbi Brown Skin Foundation Stick vs. Maybelline Fit Me Shine-Free + Balance Stick Foundation

    Hi Everyone!

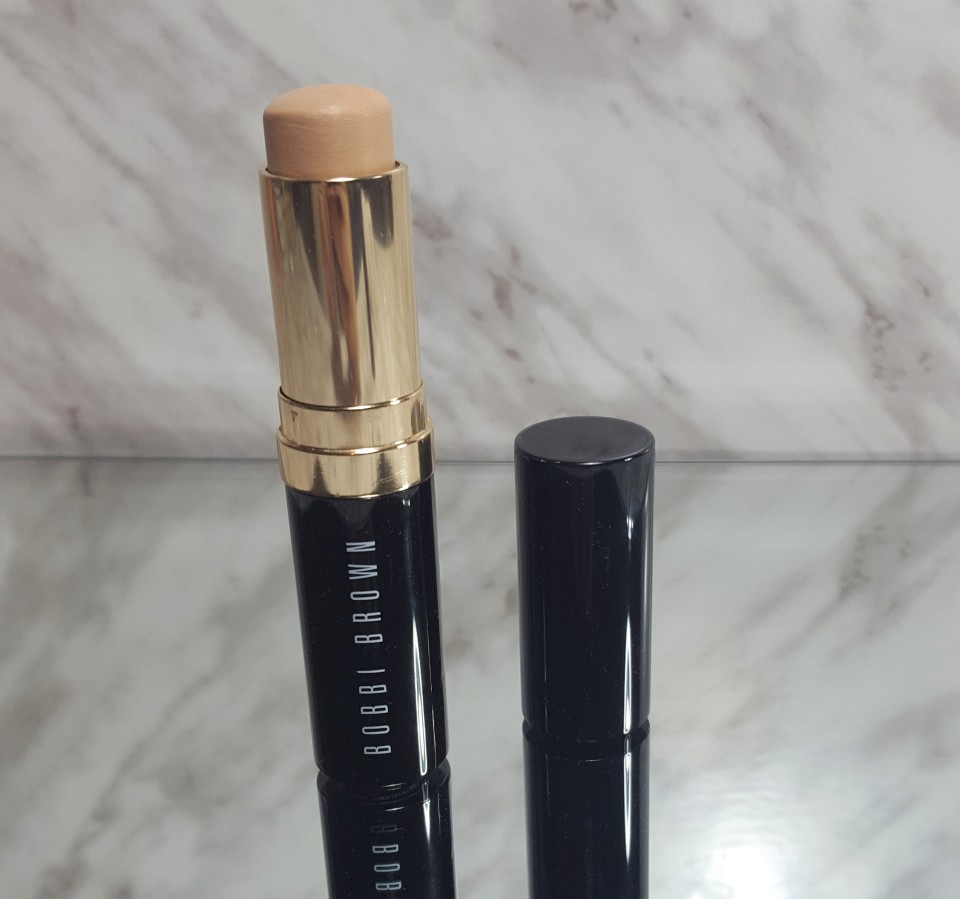
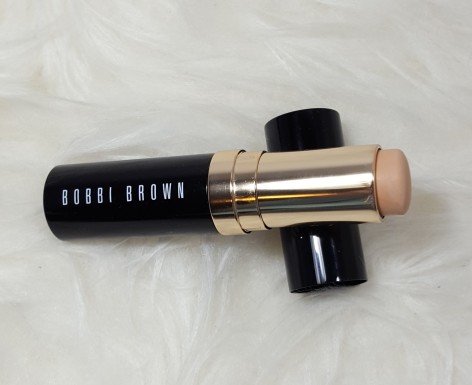
    Today, I’m comparing two stick foundations: Bobbi Brown’s Skin Foundation Stick and Maybelline’s Fit Me Shine-Free + Balance Stick Foundation. The Maybelline is obviously a lot cheaper than the Bobbi Brown and normally I would consider it a dupe, but the Bobbi Brown claims to have a natural, skin-like finish while the Maybelline stick has a natural matte finish and an anti-shine powder core that helps to mattify. For this reason, I am doing a This or That comparison instead of considering Maybelline’s stick a dupe for the Bobbi Brown one.

    20180711_195145

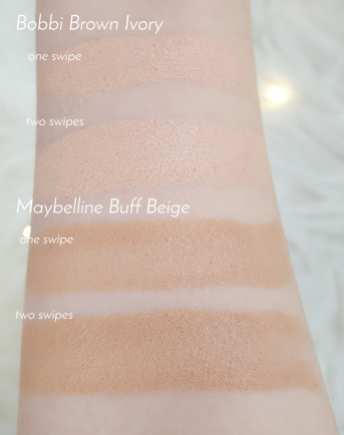
    Bobbi Brown Skin Foundation Stick in Ivory 0.75 – I got this at the MAC warehouse sale in September. They didn’t have a lot of shades left, I swatched it in the warehouse and it looked pretty close, turns out I was wrong. It is way too light and I need to go up a few shades.

    Update: They’ve changed the corresponding numbers of the shades. I don’t know if they’ve reformulated, but I’m assuming Ivory is still the same shade. The corresponding number has changed from 0.75 to C-024.

    media-20180202bbDesigned to look and feel like skin, this award-winning foundation is formulated with a unique transparent base and skin tone correct pigments for the most natural-looking, skin-like finish. A Bobbi Brown original, the innovative formula features Smart Technology for targeted moisturization or oil control depending on what skin needs. Delivers medium to full coverage and comes in a convenient swivel-up stick for at home and on-the-go application.
    20180711_195159

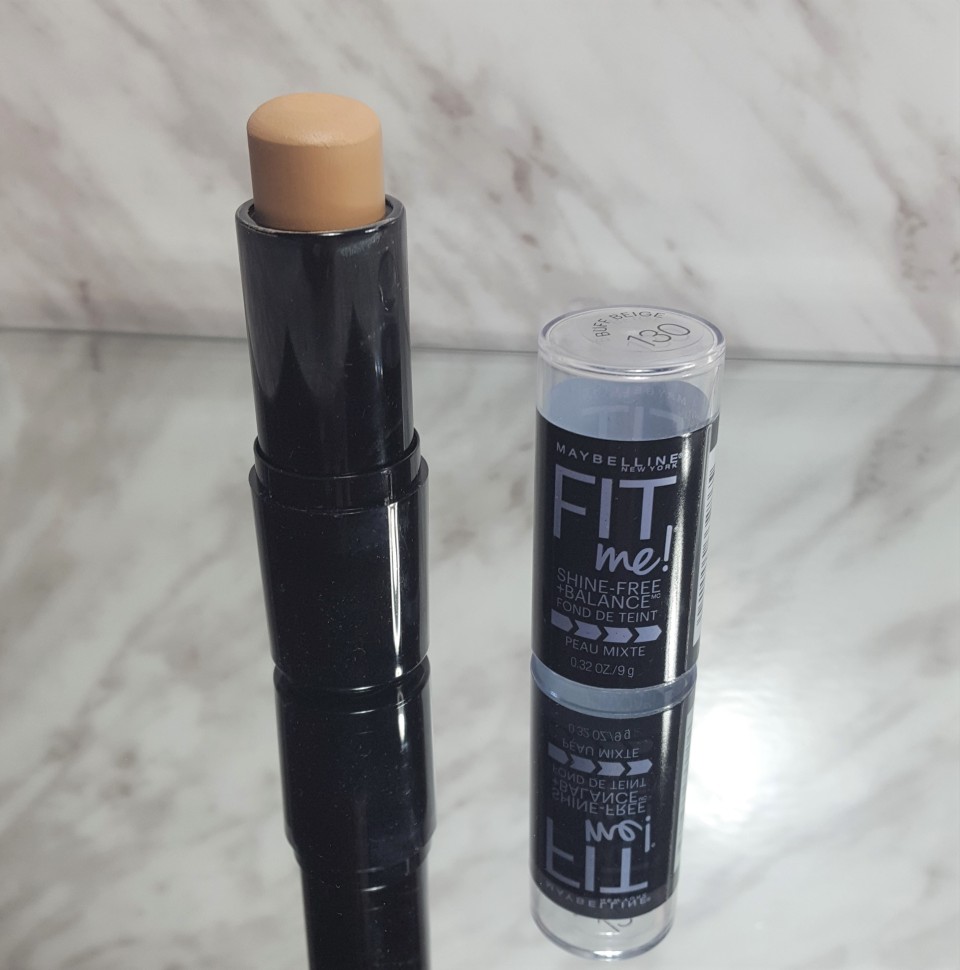
    Maybelline Fit Me Shine-Free + Balance Stick Foundation in 130 Buff Beige – I had the liquid Fit Me foundation in 130 Buff Beige, so I decided to get the stick in the same shade. Even though the liquid is a bit too dark/pink for me, there is a smaller shade selection in the stick foundations.

    media-20180202dfgd

    This lightweight gel foundation has an exclusive anti-shine powder core that instantly dissolves excess oil. Pores look minimized and skin stays shine-free for ten hours. This oil-absorbing foundation stick goes on creamy and blends into a natural matte finish. Medium coverage. Dermatologist tested. Allergy tested. Non-comedogenic. Suitable for sensitive skin. Fragrance-free.

    media-20180203ge.png

    I used my Make Up For Ever Step 1 Hydrating Primer and I didn’t apply any powder to test the wearability. Both of the sticks set to a velvety smooth finish. If you get an oily t-zone, I suggest powdering because both foundations started to break up on my forehead and chin, and my nose was super shiny by the second hour.

    Both foundations are buttery and easily glide on your skin. The Bobbi Brown covered up more of the redness around my nose, but still gave a natural, skin-looking finish. The Maybelline stick didn’t cover up as much redness and I could still see blemishes coming through, but a good concealer can easily fix that.

    WINNER (Higher Coverage, Natural Finish): Bobbi Brown Skin Foundation Stick

    WINNER (More Budget-Friendly, Natural Matte Finish): Maybelline Fit Me Shine-Free Balance Stick Foundation

    The Bobbi Brown stick has a more natural finish, yet offers more coverage than the Maybelline stick. The Bobbi Brown stick is also more buildable which makes sense because it claims to offer medium-full coverage while the Maybelline stick says medium coverage. The Maybelline stick evened out my skin tone, but didn’t cover up dark spots from blemishes.

    I think the Maybelline is a good everyday foundation for those who just want a natural matte finish and you can pair it with a good concealer (Maybelline’s Fit Me Concealer is a great drugstore option if you can find a match for your skin tone). I think it would also be good for summer because it looks natural, but mattifies at the same time. Since the Bobbi Brown stick is more expensive, I would save it for evenings (dinners or special occasions) because it did give a very beautiful finish.

    Have you tried stick foundations? What are your fave brands?

    Love,

    jen

  • Make Up For Ever Artisan Brush 106S vs. Arbonne Liquid Foundation Brush vs. Sephora Liquid Foundation Brush

    This or That | Make Up For Ever Artisan Brush 106S vs. Arbonne Liquid Foundation Brush vs. Sephora Liquid Foundation Brush

    Hi Everyone!

    Today I’m doing a 3-way This or That because I had three different brands of foundation brushes. Each of the brushes I bought as part of a set:

    • Sephora- to be honest, I can’t remember what this brush came with and it’s not in my order history. I think it was a travel brush kit. This brush from the PRO collection looks the most similar out of the brushes they currently offer.
    • Make Up For Ever Ultra HD Foundation + Smoothing Skin Equalizer Customizable Set | $83 CAD
      • Step 1 Skin Equalizer smoothing primer
      • Ultra HD Invisible Cover Foundation (your choice)
      • Artisan Brush 106S (the brush is a short version of the 106)
    • Arbonne Cosmetics Brush Set #7098 (6-piece brush set) | $47 CAD

    The only reason I have a MUFE foundation brush is because it came in the set. I prefer applying my liquid foundation with sponges, so I probably wouldn’t buy a liquid foundation brush on its own.

    sephora brush.PNGSephora liquid foundation brush

    I do have another Sephora foundation brush, but it’s a little worse for wear. It is softer than this travel-sized brush, but performs about the same.

    arbonneArbonne

    100% vegan and cruelty-free

    Liquid Foundation / Flat Brush: Great for liquid foundations
    and concealer for proper blending; features a rounded head to match the natural contours of the face such as the corners under the eyes.

    mufeMake Up For Ever Artisan Brush

    This is a larger variation of a foundation brush for applying and blending ultra fast for an even result with fuller coverage. It can be used with all types of foundations and features straight fibers.

    brushes

    I used the Make Up For Ever Ultra HD Invisible Foundation for the swatches (the swatches are aligned with the picture of the brushes- top swatch is Sephora, middle is Arbonne and bottom is MUFE). I pumped once directly onto the brush just to see how much product it absorbed. The swatches are after two swipes of the brush. As you can see, the Sephora swatch on the top is shiny which means the foundation was still wet. When I did the second swipe, I did my best to go directly on top of the previous swatches. The Sephora brush fanned out a bit when it touched my skin. The Arbonne brush is denser/thicker (the other two are flatter). The Make Up For Ever brush is the widest and the swatch above shows that. The Sephora brush’s bristles aren’t as soft as the other two. Out of the three, the MUFE one is the softest, but it absorbs the most product.liquid foundation brushes.PNG

    I wanted to do swatches on a flat surface that wouldn’t absorb product, so I used a foundation palette. I pumped three equal-sized dots of Maybelline’s Fit Me Dewy + Smooth Foundation and I swiped the brushes twice to see how much product absorbs into the brush. Again, the swatches are in the same order: Sephora (top), Arbonne and MUFE. The Sephora one is the darkest and MUFE is the lightest swatch because the Sephora brush barely absorbs any foundation and the MUFE one absorbs the most. The Sephora brush has the stiffest bristles which reminds me of a paintbrush. The Arbonne brush is okay, but it’s not as wide as the other two, but it’s denser which means a lot of product gets lost in the brush. The MUFE brush is wide and flat and the bristles are soft. That’s why I have to give the win to the MUFE brush.

    WINNER: Make Up For Ever Artisan Brush

    Do you prefer sponges or brushes to apply liquid foundation? What’s your favourite brand for brushes/sponges?

    Love,

    jen

  • Smashbox Photo Finish Color Correcting Foundation Primer vs. Make Up For Ever Step 1 Skin Equalizer Primer (Redness Correcting)

    This or That | Smashbox Photo Finish Color Correcting Foundation Primer vs. Make Up For Ever Step 1 Skin Equalizer Primer (Redness Correcting)

    Hi Everyone!

    Today, I’m comparing two high end colour correcting primers: Smashbox Photo Finish Color Correcting Foundation Primer- Adjust and Make Up For Ever Step 1 Skin Equalizer Primer- Redness Correcting Primer.

    I own the travel-sized Smashbox primer, but used the 1 oz price to compare it to the Make Up For Ever primer.

    media-20171218121212Smashbox Photo Finish Color Correcting Foundation Primer- Adjust

    Look less red! This green-toned primer color-corrects redness, blurs pores, evens skin tone & reduces the appearance of fine lines.

    media-2017121812Make Up For Ever Step 1 Skin Equalizer Primer- Redness Correcting Primer

    REDNESS CORRECTING PRIMER instantly neutralizes and evens out red tones for flawless foundation coverage. Green Spectraflex® pigments color correct redness and boost radiance while moisturizing agents provide hydration. Skin tone is evened out for a flawless makeup all day long.

    111224.png

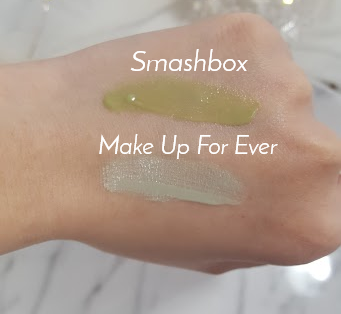
    The Smashbox primer didn’t reduce any redness, when you blend it into your skin. It’s like they added a green tint to their silicone photo finish primer that blurs pores. The green sort of just moves around and doesn’t blend in as well.

    The Make Up For Ever primer has the consistency of a moisturizer/serum and when you blend it into your skin, it actually neutralizes redness. Although if you constantly have to cover up redness, I suggest investing in a colour correcting concealer instead of a primer.

    WINNER: Make Up For Ever Step 1 Skin Equalizer Primer- Redness Correcting Primer

    If you’re looking at which primer actually conceals redness, Make Up For Ever is the winner. If you prefer Smashbox Primers, I would just buy the Photo Finish one and then use a colour correcting concealer on top of it because when I was blending the swatches on my hand, I was just moving green chunks around on my hand.

    I get red on and around my nose and chin, and sometimes the Make Up For Ever primer doesn’t cover it. I think if you get very mild redness, then the primer is okay, but if you constantly need to cover up redness, I think it’s best to invest in a colour correcting concealer and just get a regular face primer. I absolutely love the two other Step 1 Skin Equalizer Primers that I’ve tried: smoothing (For Large Pores & Fine Lines) and hydrating (Universal formula for normal skin with occasional dryness). They have a light scent to them, like a nice perfume. Make Up For Ever has four natural finish primers: hydrating, redness correcting, nourishing and smoothing. They also sell a mattifying one and radiant finish colour correcting primers (blue, pink, yellow, peach, caramel and mauve).

    Some recommendations for a colour correcting concealer: Urban Decay’s Naked Skin Color Correcting Fluid and the NYX HD Photogenic Concealer Wand- Green. The Urban Decay and NYX ones are similar, the NYX one is a dupe for the Urban Decay one in terms of the type of product, but the shades of green are very different and the NYX one is thicker. Even from my swatches below, you can see that the NYX one has absorbed into my skin a bit and the Urban Decay one is more liquid.

    media-20171218

    NYX HD Photogenic Concealer Wand- Green

    Urban Decay’s Naked Skin Color Correcting Fluid

    What are your fave colour correcting products?

    Love,

    jen

  • This or That | Maybelline Master Precise Curvy Liquid Liner vs. Milani Eye Tech Perfection Liquid Liner

    Hi Everyone!

    I can’t believe it’s already October and Canadian Thanksgiving is this weekend, where has the year gone? It feels like just yesterday everyone was getting read to go back to school, and now it’s almost midterm time for students. Let’s get started on my first post of this series.

    Today, I’m comparing two drugstore liquid liners: Maybelline vs. Milani Cosmetics. Both liners are innovative, easy to use pens for easy grip.

    Let me start off by saying that I’m terrible at doing winged liner, especially getting the wings even. Anything that’s geared towards helping me get that perfect wing, I’m open to trying. I’ve tried gel liners, but my favourite liners are pencils. I use kohl liners to tightline, so I’ve only bought a handful of liquid liners.

    To compare the two, the Master Precise liner is a lot thicker and the liner itself isn’t as dark. It’s a great liner if you’re going for a thicker, Amy Winehouse look. The Eye Tech liner gives a thinner, sharper wing; the tip is rigid enough that I can get a good flick.

    maybelline.PNGMaybelline Master Precise Curvy Liquid Liner

    Master Precise Curvy liquid eyeliner with an innovative grip and patent pending curve hugging tip. Now, you control the curve! This liquid eyeliner features an easy grip pen to provide the ultimate control in application. Maybelline’s patent pending tip, hugs lids for a seamless curvy line.

    milaniMilani Cosmetics Eye Tech Perfection Liquid Liner

    If you’ve ever struggled with liquid eyeliner before—ever had it skip or smear—the mistake-proof Eye Tech Perfection Liquid Liner is for you. The high tech, felt-tip tool makes a liquid lined eye a breeze. The non-feathering, water-resistant formula comes in the richest, deepest black available. Use this liquid liner for a long-wearing, intense eye look that’s professionally precise.

    WINNER: Milani Cosmetics Eye Tech Perfection Liquid Liner

    At some point, I’ll have to test a regular Maybelline liquid liner pen and some other drug store brands to see how the felt tips are, but between these two, I award the win to the Eye Tech Perfection Liquid Liner.

    What are your fave liquid liners?

    Love,

    jen

  • makeup eraser makep remover cloth vs danielle creations erase your face cloth

    Dupe It Out | MakeUp Eraser Makeup Remover Cloth vs. Danielle Creations Erase Your Face Cloth

    Hi Everyone!

    It’s time for another Dupe It Out! Today, I’m comparing The Original MakeUp Eraser Makeup Remover Cloth by Makeup Eraser and the Erase Your Face Cloth by Danielle Creations. Both cloths remove makeup by just adding water, no makeup remover needed! I put them both to the test and here are my findings. I’ve already written a review on the Makeup Eraser, click here.

    c700x420MakeUp Eraser Makeup Eraser Makeup Remover Cloth

    Remove smear-proof, waterproof makeup and mascara with The Original MakeUp Eraser®. Free of chemicals, this makeup remover gets rid of all types of makeup, including stage, sports, and theatrical makeup. Each cloth will last a thousand washes, and you only need to add warm water and then remove makeup. This ultra-soft, woven polyester-blend cloth gets rid of tough makeup without leaving behind a residue—just a fresh, healthy feeling.

    71V49RjPWgL._SY355_.jpgDanielle Creations Erase Your Face Makeup Removing Cleansing Cloth

    The Erase Your Face Makeup Removing Cleansing Cloth is a reusable cloth that removes all traces of makeup from your face without harmful chemicals

    For sensitive skin

    Removes all types of cosmetics, including waterproof mascara

    No harmful chemicals or synthetic makeup removers

    Just add water

    Machine wash with cold water

    20180529_005452.jpg

    WINNER: It’s a tie!

    The Erase Your Face (top) has a rectangular shape with rounded edges, while the Makeup Eraser is rounder. The Erase Your Face has a bit more material since it isn’t as rounded. Both cloths have two different sides; one is similar to a plush material, while the other is more like a soft towel where the fibers are shorter. I’ve tried using both sides and the shorter side did a better job at removing my eye makeup. They both took off the face makeup well, but I don’t think either cloth does a good job at removing eye makeup that’s waterproof. You would have to scrub at your eye and that’s not ideal since the skin around your eyes is thinner and more sensitive. I usually use the cloths if I have light eye makeup on, or I use the cloth for my face and then use my regular eye makeup remover. It still saves you some money because you don’t use makeup remover or a cleanser for your face. You could probably find a cheaper microfiber towel that will do the trick of removing your makeup. If I had to choose, I would get the Erase Your Face because you get four of them for $15.

    Love,

    jen

  • Dupe It Out | Tangle Teezer The Original Detangling Hairbrush vs. Claire’s Detangling Brush

    Hi Everyone!

    Welcome to my first post in the Dupe It Out Series. Today, I’ll be comparing hair detangling brushes: The Original Detangling Hairbrush by Tangle Teezer and a Mint Detangling Hairbrush dupe from Claire’s. I’ve already written a full review on the Tangle Teezer brush.

    Tangle_Teezer_Original_Professional_Detangling_Hairbrush___Black_1511951069Tangle Teezer The Original Detangling Brush

    The Original is the ultimate detangling hairbrush. Using our innovative two-tiered teeth system technology, it detangles with minimum fuss, breakage and damage, leaving hair smooth, soft and shiny.

    97288_2Claire’s Mint Detangling Hairbrush

    Look after your hair by getting through all those stubborn knots with our super soft detangling hairbrushes!

    WINNER: Tangle Teezer’s Original Detangling Brush

    The Claire’s one wasn’t ergonomically designed to fit into your palm. I have a fairly large palm and I kept dropping it because it’s so slippery. I’ve had a few close calls where it almost fell into the toilet. I have dropped it on the floor a few times. I bought a Forever 21 detangler with a handle, but it was rock hard and hurt to comb my hair. The Claire’s and Tangle Teezer are much softer on the scalp.

    I was blow drying my hair and using the Claire’s detangler, but I got a bit too close to the heat. The dryer melted the detangler into my hair! I had to re-wash a section of my hair to get the little bits of mint green plastic out.

    *At the time of writing this, the Tangle Teezers with handles didn’t exist yet. I would definitely choose a Tangle Teezer with a handle over the no handle ones.

    Have you tried hair detanglers?

    Love,

    jen