• true bloom HydroBloom™ Skin Rejuvenation Kit

    First Impressions with TrueBloom HydroBloom Skin Rejuvenation Kit

    Hi Everyone!

    Today, I’ll be sharing my first impressions review of a gadget from a brand called TrueBloom.

    Hydrodermabrasion combines a 2 stage process into one quick and easy treatment for clearer and healthier skin.
    ​Stage 1 is the Detox and Exfoliation process. The warm water polishes and deeply cleanses your skin while the strong yet gentle vacuum unclogs your pores and removes toxins from your skin!
    Stage 2 is the Revitalization and Brightening process. The vacuum suction increases blood flow, triggering natural collagen production while stimulating new cell growth.
    ​Collagen is the essential protein which provides the elasticity in the skin, helping your skin look and feel young and healthy. 

    • Easy 5 Minute Weekly Treatment
    • Sucks Dirt & Makeup From your Face
    • Unclog Pores, Remove Blackheads & Whiteheads
    • Stimulates Anti-Ageing Via Collagen Production
    • Improve Skin Tone & Texture
    • Reduces Wrinkles & Fine Lines
    • Suitable For All Skin Types
    • true bloom HydroBloom™ Skin Rejuvenation Kit

    I’ve always been curious about these types of devices. You put warm water into the device which cleanses the skin while the vacuum removes toxins and unclogs skin. The vacuum is meant to increase blood flow and stimulate new cell growth. The device comes with 6 different attachments – 3 silicone ones and 3 hard plastic (different sizes for each). The instructions in the box aren’t the most coherent, but it gets the message across.

    The suction on this device is very strong and I’m a bit concerned about it causing bruising on the more sensitive areas of my face. I made sure to read instructions carefully before using it. I tested it out on my arm to see how strong the suction was and it got a bit red. After a while it went away, so I tried it out on my face. I got a red mark on my forehead and jawline which stayed there for the rest of the night. On the website, there’s before and after shots of the water. There’s one compartment for the clean water and another for where the water goes after. I’ve seen the water look cloudy and kind of yellow in some pictures. I’m assuming the person who used it had removed their makeup with the device. When I tried it, the used water was a little cloudy and there were a few hairs in it, but I didn’t see anything else.

    I’ll continue to try it out on my arms and legs just to see if it helps with blood circulation. I don’t get a lot of blackheads, but if I do, I will test it out. I’m curious to see if it’s strong enough to pull out a blackhead. For now, I will just have to test it out long-term to see if it does improve blood circulation and improve skin tone.

    RATING: 2/5

    At the moment, I’m not convinced this product is necessary for your skincare routine. It feels like it’s just another gadget that I’ll use for a few months and then forget about, but we’ll see. Especially with this being gadget from a brand that’s not well-known. Maybe one from a better known brand would have a gentler suction.

    Have you tried one of these gadgets?

    Love,

    *This product was sent to me complimentary for a review. All opinions are my own.

  • Haul | March 2019 Korean Skincare

    Hi Everyone!

    It’s been a while since I did a haul blog post and because I’ve been on a low buy, there’s been no reason to do one. I’ve almost run out of my current cleanser (KORAI Cloud Cleanser – read my review) and my COSRX Acne Pimple Master Patches (read my review), so I decided to order a bunch of different ones to try. Hopefully, these will last a while because I bought so many. I purchased the products from Chuusi.ca (a Canadian online shop that sells Korean beauty and skincare). I’ve previously bought from them and they ship things out really quickly. Last time, I ordered and then received a notification 3 hours later. This time, it was the next day since I ordered on a weekend. I’m really excited to try the products I ordered:

    • 3x COSRX Acne Pimple Master Patches
    • 2x Benton Goodbye Redness Centella Mask Pack
    • Nature Republic Soothing & Moisture Aloe Vera Foam Cleanser
    • COSRX Low pH Good Morning Gel Cleanser
    • Tosowoong Enzyme Powder Wash
    • Heimish All Clean Balm
    • Banila Co. Clean It Zero Cleansing Balm (Original)
    • Mizon Apple Smoothie Peeling Gel
    • NEOGEN Bio-Peel Gauze Peeling (Green Tea)
    • Tony Moly Shiny Foot Super Peeling Liquid.

    I’d love to try other acne patch brands. So far I’ve only tried COSRX and Nexcare ones (read my This or That post comparing them)

    Update: Click here to read my review comparing the two cleansing balms.

    Have you tried any of these products? What are your fave K-beauty products?

    Love,

  • tula skincare purifying face cleanser illuminating face serum pro-glycolic resurfacing gel

    First Impressions with TULA Skincare

    Hi Everyone!

    Today, I’m reviewing products that I ordered from TULA skincare. I had been seeing TULA products all over Instagram and wanted to give them a try. The products are cruelty-free and they are formulated with probiotics. Now, I’m not a scientist and all I really know about probiotics is that it’s sometimes in yogurt and cheese. I know that it provides health benefits and help with digestive problems.

    Pictures taken from TULA website

    I purchased the Discovery Kit to start out. The products are all travel-sized and meant to last about a month. I also decided to buy the Acne Clearing + Tone Correcting Gel as well.

    Since I had 5 new products, I wanted to ease into using it just in case I had a reaction. I started with the Purifying Cleanser, two weeks later, I started the Illuminating Face Serum, Acne Clearing + Tone Correcting Gel. A few days later, I started the Pro-Glycolic Resurfacing Gel and then a week after that, I started the Hydrating Day & Night Cream.

    Originally, I was using just the Tula products, but since I started using the Hydrating Day & Night Cream last, my face still felt fairly dry. So, I incorporated a few drops of the Tarte Maracuja Oil to the routine.

    For the Face Serum, Acne Gel and Resurfacing Gel, I use 1 pump for each application and just a dab of the Day & Night Cream. I used all products every day (AM & PM) until I finished them. They all lasted a little over a month.

    When I started using the products, I had a cluster of dark spots from clogged pores on my cheek. After I finished 3/5 of the products, the dark spots were almost gone. My NARS Soft Matte Complete Concealer used to be unable to cover them, but now, my foundation can conceal what’s left. I don’t know if it was a result of the serum or the acne gel, but I was very impressed. I expected that I’d have the dark spots for months until they faded.

    Purifying Face Cleanser $35

    This refreshing probiotic gel cleanser goes deep into pores to remove impurities and helps condition skin, without stripping or over-drying.

    RATING: 4.5/5

    Hydrating Day & Night Cream $65

    Delivers deep hydration to help revive dull skin. This nourishing cream, full of naturally derived probiotics and superfoods, reveals an even, glowing, youthful-looking complexion. 

    RATING: 4.5/5

    Pro-Glycolic 10% pH Resurfacing Gel $42

    This alcohol-free toner uses probiotics, glycolic acid, and beetroot extract to gently exfoliate the skin, leaving it looking smooth, hydrated and more even.

    RATING: 5/5

    Illuminating Face Serum $98

    This lightweight serum expertly targets the appearance of dark spots, hyperpigmentation and dull skin, revealing a youthful glow and brightened complexion.

    RATING: 5/5

    Acne Clearing + Tone Correcting Gel $36

    Clear skin, zero irritation. Our acne gel contains 2% salicylic acid to clear up acne, prevent breakouts & brighten marks left by past acne.

    RATING: 5/5

    I think out of all the products, the Hydrating Day & Night Cream is my least fave. Even though the texture is actually quite light, I think it’s a bit heavy for my skin. I also don’t love creams that come in pots; I would prefer a tube or bottle with a pump. I am going to try their gel creams to replace it.

    I’ve finished all of the products from the Discovery Kit. I’ve reordered the Illuminating Face Serum and I also bought the Kefir Replenishing Cleansing Oil, Anti-Aging Discovery Kit. I want to slowly try all of the products that interest me. I didn’t repurchase the Pro-Glycolic 10% Resurfacing Gel because I still have 2/3 of my Pixi Glow Tonic left. Once I finish that, I will buy the Resurfacing Gel.

    Once I’ve tried out the new products, I will write a new review.

    Have you tried TULA yet?

    Love,

  • Review | Vichy Idéal Soleil Anti-Shine Dry Touch Lotion SPF60

    Hi Everyone!

    I received Vichy’s Idéal Soleil Anti-Shine Dry Touch Lotion complimentary of GlamSense and thought I’d write a review on the blog. I’ve never tried any Vichy products before so I was excited to try it.

    20180517_021741.jpg

    VICHY introduces its first dry touch, facial sun protection, with a unique powdery texture that mattifies skin, even in the most humid conditions. Long lasting anti-shine effect. 80 minutes water & sweat resistance. Dry touch lotion formulated for an active lifestyle and outdoor activities. Apply generously and evenly, on face, 15 minutes before sun exposure. Reapply at least every 2 hours, after 80 minutes of swimming or sweating and immediately after towel drying.

    I was really impressed by this lotion, I love that it dried fast and didn’t feel tacky or oily. The consistency isn’t too thick (it’s like a moisturizer). It went well under my liquid foundation. It smells faintly like sunscreen, but it’s not overpowering like other sunscreens out there. I give it two thumbs up!

    RATING: 4/5

    It’s quite expensive for a facial sunscreen, but you should always protect your face with SPF and I’m guessing face sunscreen is formulated so that it can go well under makeup and not look too greasy. I’ve tried Neutrogena’s which is half the price, I’ll compare the two in a This or That post.

    Have you tried Vichy products? What sunscreens do you use on your face?

    Love,

    jen

  • coastal scents eclipse palette

    Review | Coastal Scents Eclipse Palette

    Hi Everyone!

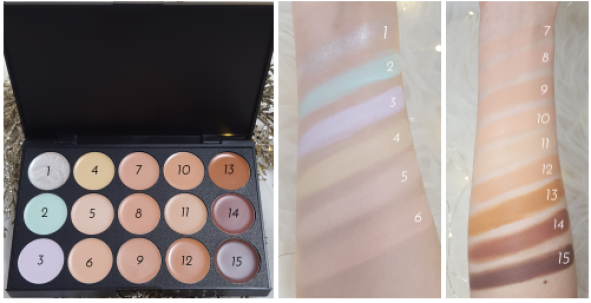
    Back when I bought the Winterberry Palette from Coastal Scents (read my full review), I also bought the Eclipse Palette (a cream concealer palette). It comes with fifteen shades: white/silver, mint green, pale yellow, lavender, and 11 skin-coloured shades (pale to dark).

    Coastal Scents Eclipse Palette

    We’ve got you covered—literally. Neutralize under eye halos, conceal blemishes, banish breakouts, and reduce redness with fifteen cream-based shades. Designed to conceal, highlight, and custom blend to your skin tone, watch your flaws disappear.

    The mint green shade counteracts redness or pinkness caused from rosacea, blemishes, or capillaries around the nose and cheek areas.

    The pale yellow shade conceals black, blue, or purple imperfections such as bruises or unsightly under eye halos.

    The lavender shade neutralizes areas with excessive yellow pigmentation and corrects olive skin tones.

    The white/silver shade can be used as a highlighter to add sheen to cheekbones, nose and eyes.

    coastal scents

    I’ve tried applying these concealers with a brush and with my fingers. I find the best way is to use my fingers or apply with the brush, but then blend out with fingers. Using a brush requires a little more effort to blend in, and this isn’t exactly ideal for your under eyes. With the warmth of my finger, the cream blends out smoothly. I’ve been using either the hydrating or smoothing primer from Make Up For Ever under these concealers. To apply, I use my ring finger and swirl it in the concealer, then lightly dab it onto my face.

    How I Use the Shades

    I got the palette mostly to try the green and lavender shades. I’ve tried the green corrector from NYX, but the green is a bit too pale (I’ve swatched it next to the Urban Decay one- see here). I haven’t used the pale yellow too much. The green has been covering up redness really well. I’ve been using the lavender for under eyes to cover up dark circles, although I should test out the yellow for under eyes too.

    For any colour-correcting concealer, you don’t blend it in all the way. You blend it just enough so that the colour is spread evenly, but you still want to see the purple, yellow or green. If you blend it all the way, then whatever you’re trying to cover up won’t be covered!

    I was testing out the shades to see which would match my face and Shade 11 is pretty close. I could probably mix it with one of the others.

    I’ve tried Shades 6 and 7 under my eyes, but I prefer using a more fluid concealer instead of a cream-based concealer to avoid cakey under eyes (especially when I might already be using the lavender one).

    I’ve been using Shade 14 and 15 for contour. A small amount goes a long way, so I do a very thin line. I like to use my finger. When I contour my nose, I use a concealer brush to apply so it’s more precise, but then use my ring finger to blend out.

    I don’t really use the other skin-coloured shades since they’re not a good match, but I could probably use them as cream eyeshadows or something.

    At first, I didn’t really know what to do with the white/silver shade. I tried it as a highlight, but since it’s cream, it’s hard to blend out nicely without accidentally taking off your other makeup. Since the lavender, green and yellow shades are used for underneath your makeup, I thought I would try the white/silver one UNDER my foundation. I applied it to my cheeks where I would apply highlighter and blended it in. I didn’t blend it in all the way- similar to the colour-correcting shades, I blended just enough so that I looked like I was going to put on some galactic makeup. I applied my foundation on top of it and it leaves you with glowy, but natural look. It’s perfect for the day time when you don’t want to apply the most poppin’ highlighter you have, but just want a subtle glow and dewiness.

    Another way to use the white/silver shade is to apply it under eyeshadow. It made my metallic eyeshadows go from beautiful to gorgeous! It’s like a primer that makes your shadow so metallic that it gives it that wet look.

    media-20180210sdge34.png

    RATING: 4/5

    I really like this palette. I wish I could pick and choose the shades I wanted, but for less than $10, you can’t go wrong. I read reviews on the Eclipse Palette and a lot of people had problems with it blending well or looking cakey. I think you need a really good base (I always use a moisturizing or smoothing primer) and the best way to apply is with your fingers. Also, since this is a cream concealer, if you have any dry patches, they will show. So, unfortunately, your skin can’t be too dry or the concealer will emphasize the dryness.

    I definitely want to try higher end cream concealer palettes or even drugstore ones because I don’t love that this palette was Made in China (which I didn’t know when purchasing). Check out my blog post- Where Were Your Beauty Products Made?

    Also, since I’m Canadian, ordering from Coastal Scents costs a lot of money because they charge shipping, so I’d prefer something where I don’t pay more for shipping than the product.

    Have you tried cream concealers/colour correcting concealers? What are your faves?

    Love,

    jen

  • Review | Gosh Cosmetics Click’N Conceal Pen

    Hi Everyone!

    When I was at Shoppers Drug Mart a few months ago, they were having a 50% off sale for GOSH Cosmetics products. There wasn’t a lot left, but they did have a click concealer pen in light and I thought I’d try it. Since it’s a click pen, I figured the formula would be more runny than the usual concealer you get in the wands and I was right. The consistency is similar to the YSL Touche Eclat pen. I can’t say whether or not this is a dupe for the YSL Touche Eclat, but I really like the Gosh Cosmetics pen. At first, I thought the shade would be too peachy for me, but it actually helps concealer the darkness under and around my eyes. One you blend it, it somehow looks lighter than when you dab it onto your skin.

    I like that it’s not drying- after I apply concealer under my eyes, it’s not cakey or heavy. It has a natural finish and it’s a perfect consistency for under the eyes. I also love Rimmel’s Wake Me Up Concealer for under eyes too (I use 030 Classic Beige, but think I could go a shade lighter).

    Gosh Cosmetics Click’N Conceal in 01 Light

    CLICK`N CONCEAL is a high quality concealer with a smooth and soft texture. The brush will easily brush away imperfections and spots on your skin leaving a refreshed and flawless skin. Ideal for hydrating and protecting the delicate skin around the eyes. Reduces dark circles & puffiness. No perfume, no parabens.

    I swatched it on my hand and then the right side is after it’s blended.

    gosh cosmetics

    Below is before and after I applied it. You can see that before applying it, I have a bit of darkness around my eyes, but once I applied the concealer, it brightened up the area. I primed my under eyes with Smashbox’s Photo Finish Hydrating Under Eye Primer.

    RATING: 4/5

    I dock a point because it’s not very easy to find, especially now that Shoppers is having a going out of stock sale for it. I found 2 more at another Shoppers and stocked up.

    What’s your favourite concealer for under the eyes? I know Maybelline’s Age Rewind and Tarte Shape Tape is a fave for many.

    Love,

    jen

  • This or That | iBeauty Oval Brushes vs. Simple Glam Girls Lush Rose Gold Oval Brushes

    Hi Everyone!

    Today, I will be comparing two different brands of oval brushes: Simple Glam Girls and iBeauty (that I bought from Winners). Oval brushes are the brushes that resemble toothbrushes, made popular by the Artis brushes. I’ve never tried an Artis brush so I can’t compare the quality of the Simple Glam Girls and iBeauty brushes.

    NEW JC TITLES(1)

    I’m going to start by saying that I prefer damp beauty sponges to apply my foundation and concealer, even though sponges absorb a lot more product than a brush. Comparing oval brushes to regular brushes, I feel like it’s harder to clean them because the bristles are packed so tightly.

    media-20171228gdLush Rose Gold Oval Brushes (set of 10)

    10 high-quality oval shaped brushes made with grade “A” synthetic nylon hair.

    Contoured oval shaped brushes with different sizes allow you to blend makeup onto any part of your face effortlessly.

    Rose gold neck handle & a firm & anti-slip holder for that extra hold when applying makeup

    media-20171228wweiBeauty Oval Makeup Brushes (set of 3)

    Very easy and comfortable to use for putting on your daily makeup

    Used for: contour/setting powder, contour/blush, & concealer

    Gives a flawless air-brushed finish of all types of skin makeup formulas

    I have 3 brushes that are similar to the ones in the link, but they are slightly different (same sizes though). Even though it says it can be used for setting powder, I wouldn’t use an oval brush to set my makeup because it would blend out all the foundation and concealer I just applied. A fluffy brush is best to set your face.

    NEW JC TITLES(2)

    Both sets of brushes are very soft. The Simple Glam Girls brushes are packed more tightly than the iBeauty ones and therefore less streaky. You can tell from the picture above, the top brush is the iBeauty one and the bottom is Simple Glam Girls.

    For the swatches, I used liquid foundation and a powder bronzer, the top swatches are the iBeauty oval brushes and the bottom ones are Simple Glam Girls brushes. The liquid foundation swatches look similar (although the iBeauty brushe absorbed a lot more of the liquid). For the powder bronzer swatches, you can tell the top swatch is a bit more patchy and uneven. The smallest oval brush in the iBeauty set is a bit thicker than the Simple Glam Girls brush so it gave a thicker swatch.

    Since the iBeauty ones aren’t packed as tightly, it absorbs more of the liquid foundation and when you clean the brushes, it takes longer to clean them. When I run my finger along the brushes when they’re wet from cleaning, the Simple Glam Girls brushes’ bristles spring back into place, whereas the iBeauty brushes’ bristles clump together. The neck of the brushes is also sturdier on Simple Glam Girls brushes. The iBeauty ones, the neck of the brushes bends really easily. The oval brushes are so soft, I can’t wait to try the Unicorn or Perfect 10 brushes from Simple Glam Girls.

    WINNER: Simple Glam Girls Lush Rose Gold Oval Brushes

    The iBeauty brushes do a decent enough job, I think they are better with powdered products (like for contouring) since it absorbs so much liquid.

    Have you tried oval brushes? What are your thoughts?

    Love,

    jen

    *I received the Simple Glam Girls brushes for free (just paid shipping) as part of their ambassador program, but I was not paid to write a review of any sort nor do I receive any commission if you use the discount code.

  • Smashbox Photo Finish Color Correcting Foundation Primer vs. Make Up For Ever Step 1 Skin Equalizer Primer (Redness Correcting)

    This or That | Smashbox Photo Finish Color Correcting Foundation Primer vs. Make Up For Ever Step 1 Skin Equalizer Primer (Redness Correcting)

    Hi Everyone!

    Today, I’m comparing two high end colour correcting primers: Smashbox Photo Finish Color Correcting Foundation Primer- Adjust and Make Up For Ever Step 1 Skin Equalizer Primer- Redness Correcting Primer.

    I own the travel-sized Smashbox primer, but used the 1 oz price to compare it to the Make Up For Ever primer.

    media-20171218121212Smashbox Photo Finish Color Correcting Foundation Primer- Adjust

    Look less red! This green-toned primer color-corrects redness, blurs pores, evens skin tone & reduces the appearance of fine lines.

    media-2017121812Make Up For Ever Step 1 Skin Equalizer Primer- Redness Correcting Primer

    REDNESS CORRECTING PRIMER instantly neutralizes and evens out red tones for flawless foundation coverage. Green Spectraflex® pigments color correct redness and boost radiance while moisturizing agents provide hydration. Skin tone is evened out for a flawless makeup all day long.

    111224.png

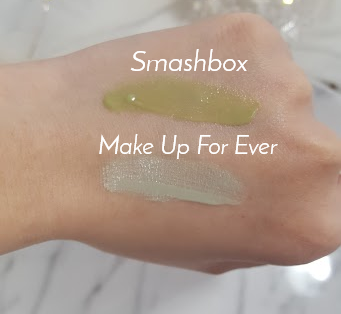
    The Smashbox primer didn’t reduce any redness, when you blend it into your skin. It’s like they added a green tint to their silicone photo finish primer that blurs pores. The green sort of just moves around and doesn’t blend in as well.

    The Make Up For Ever primer has the consistency of a moisturizer/serum and when you blend it into your skin, it actually neutralizes redness. Although if you constantly have to cover up redness, I suggest investing in a colour correcting concealer instead of a primer.

    WINNER: Make Up For Ever Step 1 Skin Equalizer Primer- Redness Correcting Primer

    If you’re looking at which primer actually conceals redness, Make Up For Ever is the winner. If you prefer Smashbox Primers, I would just buy the Photo Finish one and then use a colour correcting concealer on top of it because when I was blending the swatches on my hand, I was just moving green chunks around on my hand.

    I get red on and around my nose and chin, and sometimes the Make Up For Ever primer doesn’t cover it. I think if you get very mild redness, then the primer is okay, but if you constantly need to cover up redness, I think it’s best to invest in a colour correcting concealer and just get a regular face primer. I absolutely love the two other Step 1 Skin Equalizer Primers that I’ve tried: smoothing (For Large Pores & Fine Lines) and hydrating (Universal formula for normal skin with occasional dryness). They have a light scent to them, like a nice perfume. Make Up For Ever has four natural finish primers: hydrating, redness correcting, nourishing and smoothing. They also sell a mattifying one and radiant finish colour correcting primers (blue, pink, yellow, peach, caramel and mauve).

    Some recommendations for a colour correcting concealer: Urban Decay’s Naked Skin Color Correcting Fluid and the NYX HD Photogenic Concealer Wand- Green. The Urban Decay and NYX ones are similar, the NYX one is a dupe for the Urban Decay one in terms of the type of product, but the shades of green are very different and the NYX one is thicker. Even from my swatches below, you can see that the NYX one has absorbed into my skin a bit and the Urban Decay one is more liquid.

    media-20171218

    NYX HD Photogenic Concealer Wand- Green

    Urban Decay’s Naked Skin Color Correcting Fluid

    What are your fave colour correcting products?

    Love,

    jen

  • Haul | November 2017 Sephora VIB

    Hi Everyone!

    I just received my little haul from Sephora. I went crazy buying things at the MAC/Estée Lauder Warehouse Sale in September, I didn’t buy too many things from the sale. I just couldn’t resist buying something…20% off was too good to pass up. I bought the Shu Uemura Eyelash Curler, the Sephora Mighty Minis Brush & Sponge set, and the Estée Lauder Double Wear Stay-In-Place Flawless Wear Concealer for my mom.

    • Shu Uemura Eyelash Curler (comes with a replacement pad)
    • Estée Lauder Double Wear Stay-In-Place Flawless Wear Concealer in Warm Light Medium
    • Sephora Mighty Minis Brush & Sponge set
      • Total Coverage Sponge
      • Classic Mini Multitasker Brush #45.5
      • Solid Clean: Solid Brush Cleaner

    I chose foundation and concealer samples for my three free ones:

    • Clinique Beyond Perfecting Foundation + Concealer in 9 Neutral
    • Hourglass Immaculate® Liquid Powder Foundation Mattifying Oil Free in Shell (light, neutral undertone)
    • Benefit Boi-ing Industrial Strength Concealer in No.2 (light medium)

    I also received the Sephora PRO Flawless Airbrush #56 (mini) as a VIB Rouge Welcome Gift.

    What did you purchase from the Sephora VIB sale?

    Love,

    jen

  • 10 Products I Want to Try/Buy

    Hi Everyone!

    I haven’t been posting as regularly as I’d like because I’m trying out new products. I’m going to try my best to do more posts each week. I think I will try to post more frequently and write shorter posts rather than the long posts I’ve been doing.

    Ever since I went to the MAC/Estée Lauder Warehouse Sale, I’ve put myself on a self-imposed makeup ban until the end of the year (maybe longer). I know, a girl can never have too much makeup, but I have more makeup and skincare products than I can store. Plus, I don’t want things to go bad because I’ve neglected them. The only products I’m allowed to buy are products I have finished and need to replace.

    Since I’m still trying out some products, I thought I’d do a post about what products I hope to try and eventually buy in the future. These are a handful of products that I know are really popular and everyone loves. I know I’m behind on the times for some of these. They have been cult favourites for years.

    1. MAC Prep and Prime Fix +
    2. L’Oreal Voluminous Lash Paradise Mascara
    3. Tarte Tartelette Amazonian Clay Matte Eyeshadow Palette
    4. Pixi Beauty Hydrating Milky Mist
    5. Fenty Beauty Killawatt Freestyle Highlighter (Lightning Dust/Fire Crystal)
    6. Tarte Shape Tape Contour Concealer
    7. Lipstick Queen Frog Prince Color Changing Lipstick
    8. Maybelline Instant Age Rewind Eraser Dark Circles Treatment Concealer
    9. Erborian CC Crème High Definition Radiance Face Cream Skin Perfector
    10. Glow Recipe Watermelon Glow Sleeping Mask

    UPDATE: I’ve purchased and reviewed the L’Oréal Lash Paradise Mascara, Glow Recipe Watermelon Glow Sleeping Mask and the Pixi Hydrating Milky Mist.

    Dupe It Out | L’Oréal Lash Paradise Mascara vs. Too Faced Better Than Sex Mascara

    First Impressions with Glow Recipe

    Pixi Hydrating Milky Mist Review

    What are some products that you want to try? Are any of the ones I listed above your holy grail products?

    Love,

    jen

    Save

  • Review | Marcelle CC Concealer + Corrector

    Hi Everyone!

    20170808_151925.jpgI recently bought Marcelle’s CC Concealer + Corrector from Shoppers Drug Mart. I got the shade Light/Medium and it costs $12.95 CAD. I wanted to give a stick concealer a try, and I needed to spend $50 for free shipping, so I added it to my cart. It comes in a nice and sleek, white tube with a clear top. It was the winner of the 2015 Beauty Grand Prix by Elle for BEST CONCEALER UNDER $20. There are three reviews on the website giving it 5 stars saying that it’s hydrating and doesn’t crease. So I put the concealer to the test!

    Conceals dark circles and corrects dark spots, all in one step!

    Are the claims true?

    As a concealer, it conceals dark circles, undereye puffiness, age spots and redness. It did conceal dark circles, but I feel like there are other concealers that do a better job.

    As a corrector, it corrects and prevents the appearance of dark spots. I didn’t really try this to colour correct, but it did sort of conceal dark circles under my eyes. I only used it once, so I can’t say anything about preventing the appearance of dark spots. Unfortunately, it caused creasing under my eyes because it’s a dry formula.

    I’m very sensitive to smell when it comes to beauty products. I can’t use scented lotions or hand sanitizers unless they have a fresh, fruity smell (and even then, there are times I have to draw the line). I tend to just avoid scented creams if I can. I also don’t like if a foundation or any makeup has a chemical smell. All makeup will have some sort of chemical smell, but sometimes there’s makeup that I can’t even use because I don’t like the smell. Whenever I’m at Sephora looking for a new foundation or concealer, I always give it a sniff to see if I can stand it. I was immediately turned off by the smell of the CC Concealer + Corrector. It smells like plastic, but that’s what happens when you order something online without seeing it in person first. Even then, Shoppers and Rexall don’t always have testers for the products.

    In addition to the smell, the product looked kind of dry too, but appearances can be deceiving so I swatched it on my hand. Unfortunately, I was right, it didn’t run very smoothly against my skin (see below for pictures). I have Cover FX’s Correct Click Color Corrector, and it feels like a lipstick. It’s very smooth and blends nicely. The Marcelle concealer, on the other hand, feels gritty against your skin, I don’t know if I accidentally got some dirt in it, but I’ve wiped it a few times and it almost makes it look worse. I even swatched it on my parents to see if they felt it too and I wasn’t just imagining things. They agreed that it felt gritty. It almost feels like Tarte’s FRXXXTION Stick Exfoliating Cleanser (which I absolutely love, thanks to one of my best friend’s for introducing it to me). This is bad because this product is for the under eye area and that’s one of the most sensitive areas on your face. Regardless of the grittiness, I tried it out yesterday and noticed that it was creating creases under my eyes where I don’t have any.

    marcelle.PNG

    RATING: 0/5

    I give it a 0/5 because I didn’t like the smell or the fact that it was dry, but on top of that, I woke up this morning with a bit of a breakout. I basically exfoliated under my eyes yesterday and now my face is reacting to it. My mom said my eyes looked a bit puffy too, but that could be due to lack of sleep.

    Thoughts:  I’m an optimist, so I’d like to think that maybe there’s a chance I got an old one that dried out or it was faulty somehow, but this was a fail for me. I wouldn’t recommend this product especially with the fact that it’s for under your eyes and it feels so gritty. I don’t understand how this was rated the Best Concealer under $20 in 2015. Someone with oilier skin might like this product, but mine tends to be on the drier side. You could maybe mix this with an oil product to create a creamier consistency, but I am steering clear of stick foundations for the under eyes. I might give them a try for colour correcting though.

    Marcelle is a Canadian company, so I want to support it as a fellow Canadian. This product is a pass for me, but I like their Velvet Gel Waterproof Lip Liner in Rosy Nude and the Rouge Xpression Lipstick in 901 Amour (it won the 2016 Beauty Grand Prix for BEST LIPSTICK UNDER $12).

    I’ve heard good things about the Tarte Amazonian Clay Waterproof 12-Hour Concealer and I have a colour-correcting concealer from Cover FX that runs smoothly, so I would assume that the Cover Click Concealer + Foundation is the same formula. Both the Tarte and Cover FX Concealers are a little more expensive.

    My skin is more dry than oily (especially around my nose), so stick concealers aren’t the best for me, but the CC part of the Marcelle Concealer + Corrector interested me so I thought I would give it a try. I’ve heard rave reviews about the Nars Radiant Creamy Concealer and Tarte Shape Tape, so I might give those a try.

    What are your fave concealers?

    Love,

    jen

  • Review | COSRX Acne Pimple Master Patches

    Hi Everyone!

    I recently found the COSRX Acne Pimple Master Patches on Amazon and read some reviews about how good they are, so I thought I’d give them a try. I also picked up the Clear Fit Patches which is a thinner version. The Acne Pimple Master Patches were $6.65 CAD (free shipping) on Amazon.ca for 24 patches (3 different sizes). To be honest, I would prefer if they sold it by size. I don’t really use the small ones that often.

    dddsdsds

    The thin clear hydrocolloid patch feels similar to a hydrogel sheet mask in texture, adhering your skin strongly. It’ll stay on through showering and washing! It treats breakouts by eliminating infection and bacteria, which is what causes them in the first place. It’s able to breakdown debris from blackheads and absorb gunk from whiteheads overnight, so you won’t experience a harsh dry patch from using this. It even helps flatten and heal cystic acne faster!

    aads

    I had an underground pimple, you know, the ones that hurt but haven’t reached the surface yet, so I put a small-sized patch on the spot after I washed my face and went to bed. When I woke up, I noticed the patch had turned cloudy (it starts off a bit translucent). I peeled it off and it was no longer an underground pimple. The pimple had come to the surface and the patch had absorbed some of the pus. It left a small hole where the pimple had been, but it healed within a few days (less healing time than if I had aggravated it by squeezing it out).

    To my surprise, the patches stick really well (make sure the area is clean and dry before putting it on). I read that people sleep with the patches on and I wondered how they would stay, but once you place it on, you can barely feel it and they stay in place.

    RATING: 5/5

    I give these a 5/5 because they are amazing and actually suck up all the liquid from your pimple. I will definitely be buying these again!

    Check out my This or That posts comparing the COSRX Acne Pimple Master Patches to other acne patches:

    COSRX vs. Rael | COSRX vs. Nexcare

    I’ve also tried out the COSRX Clear Fit Patches, click here to read my review.

    Have you tried acne patches? What’s your fave brand?

    Love,

    jen

    Save

    Save

    Save