• Review | TheBalm Batter Up Eyeshadow Sticks

    Hi Everyone!

    Lately, I’ve been frequenting Winners because they have name brand products for really good prices. Sure, the products might be discontinued and older, but they’re still good. A lot of people open up the packages to see what the shades look like (I’m guilty of this), but I don’t swatch them like some people do. I’ve seen eyeshadows, blushes and powders with a finger smudge in them…gross! As a rule, I don’t buy anything that’s liquid (mascara, lip gloss, liquid lipstick, etc.) because you don’t know if people have tried them on. The only time I will buy any liquid products is if it’s clearly packaged up in plastic or if it’s in a security container (the higher end products are stored in these to prevent people from opening up the boxes). I haven’t found any shades that I like for lipsticks, but I would only buy if it’s untouched. I’ve seen some really high end brands for $10-20- Kevyn Aucoin, Bobbi Brown, Burberry, etc.

    media-20180216asaqs.jpg

    I picked up several things during my last shopping trip, but today’s review is on The Balm’s Batter Up Eyeshadow sticks. I picked up a 2-pack at Winners for $9.99! The shades are Dugout and Shutout. According to The Balm’s website, they go for $17 each and I’m guessing that’s in USD, not CAD.

    Introducing Batter Up, the long-wearing cream shadow sticks from theBalm Cosmetics! These high-pigment shadow and base multi-taskers come in eight blendable and buildable shades.

    Dugout is a metallic brown shade while Shutout is a gold shade (both are shimmery). Both the shades are beautiful on their own, but I like them together too. I’ve tried them doing gradient looks where Shutout is on the inner corner and Dugout on outer and Dugout smudged along my lashline and Shutout above. They glide easily and they’re very blendable.

    JC (NEW) titles

    I was wearing both shades yesterday. I used the Smashbox 24 Hour Photo Finish Eyeshadow Primer, then used powder to set the primer. I applied Dugout along my lashline and blended with my fingers, then applied Shutout above it and blended that with my fingers. It created a very nice gradient look. I was wearing them for about 8 hours and the shadow didn’t crease at all.

    Below are swatches of Dugout and Shutout swatched straight from stick, and then the bottom swatches are Dugout and Shutout applied from stick and then blended with a brush. I didn’t use an eyeshadow primer/base under the swatches. As you can see, Dugout is a brown shade, but when blended, its a bronze shade. Shutout is a gold shade, but when blended, it’s like a champagne shade.

    the balm batter up sticks swatchese

    RATING: 4/5

    I really like these and they are so beautiful. It’s like each stick gives you a 2-in-1 shadow because you can apply directly without blending or achieve a lighter eye look by smudging them out.

    I hope everyone has a great long weekend!

    Have you tried cream shadow sticks? What are your fave brands?

    Love,
    jen

  • Review | L’Oréal Sublime Soft Micellar Gelee Eye Makeup Remover

    Hi Everyone!

    I love using micellar water to remove my makeup, you may have seen my post: Pros and Cons to Different Types of Makeup Removers. Micellar water is very gentle and doesn’t irritate my sensitive skin. When I was at Winners, I bought a few things and this was one of them. So, I wanted to see if micellar gelee worked as well or better than micellar water. I got it for $6.99 at Winners, but it retails for $16.49 at Rexall.

    media-20180202dfgdfg.png

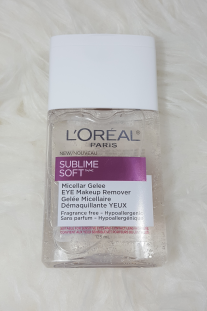
    L’Oréal Sublime Soft Micellar Gelee Eye Makeup Remover

    The micellar gelee doesn’t have a scent and the consistency is similar to spectro gel (just a tad more fluid). I would compare the gelee to a morph of micellar water and cleansing balm. Like a cleansing balm, you need to be in a bathroom or somewhere with access to water because it removes the makeup, but you need water or a face cloth to wipe off the dissolved makeup and you need to rinse your face after. It’s similar to micellar water because it’s not oily and if you accidentally get some in your eye, it won’t cloud your vision.

    Ensures an ultra efficient makeup removal experience without irritations.

    I tried several different ways to remove my makeup with the gelee: cotton pad, fingers, and face cloth. If you pour a small pea-sized amount, it takes off your eye makeup well, but you need to wash your hands because they get a bit sticky from the gelee. I tried the micellar gelee using my hands (like I do with cleansing balms), but you need water to rinse off the makeup. I don’t know about you, but when I need to wash my face at my bathroom sink, the water runs down my arms and gets all over the place. I tried using a face cloth and poured some gelee onto it; it easily wiped off the makeup without getting water all over the sink. I think using a face cloth or makeup remover cloth is the best way to use the gelee. The micellar gelee plus a makeup remover cloth will ensure all of your eye makeup is removed- I don’t know about you, but sometimes a makeup remover cloth doesn’t always get all of my eye makeup off.

    RATING: 4/5

    If you like cleansing balms, but hate when it accidentally gets in your eye and makes your vision cloudy, micellar gelee is a great alternative and it’s cheaper too. Personally, I think I still prefer micellar water as my main method of makeup removal. This was an interesting product to try, but it’s more expensive than micellar water and you get less product.

    What do you use to remove your makeup? Have you tried micellar gelee?

    Love,

    jen

  • First Impressions with The Ordinary Serum Foundation

    Hi Everyone!

    Like every other beauty enthusiast, I wanted to try The Ordinary’s Foundation, but I waited a bit to read reviews and see which one I’d prefer: Coverage or Serum.Both foundations come in 21 shades. The Serum Foundation is described as a “Lightweight Pigment Suspension System with Moderate Coverage” while the Coverage Foundation is described as a “High-Spreadability Pigment Suspension System with High Coverage.” The foundations come in a plastic bottle with a pump. The pump is matte black which is kind of harder to keep clean than non-matte pumps, but who can complain when it’s less than $10 for the foundation. They also have a glass dropper you can purchase separately if you prefer.

    After swatching both, I decided on the Serum Foundation because it’s more lightweight and not as thick. I prefer lightweight foundations especially since my face has been relatively clear recently. I used to prefer medium to full coverage matte foundations, but I think now I prefer sheer to medium coverage with a natural or radiant finish.

    media-20180123ddd.jpgSerum Foundation in 2.0N – I decided to get the shade 2.0 N (Light Medium Neutral). Usually for foundations that have different shades for each undertone, I’m either yellow or neutral. I think that neutral suits me better because yellow can sometimes be a bit too yellow. They were sold out of 2.0 N at Hudson’s Bay (they had plenty of stock at the Queen Street location, but, of course they’re sold out of my shade…just my luck). My sister was able to pick it up at the Abnormal Beauty Company store downtown.

    Serum Foundations are lightweight medium-coverage formulations available in a comprehensive shade range across 21 shades. These foundations offer moderate coverage that looks natural with a very lightweight serum feel. They are very low in viscosity and are dispensed with the supplied pump.

    I apply the foundation after using a sponge or my fingers since it’s so liquid. If you read my First Impressions Review on the Buffet serum, you saw that I applied this on top of the Buffet and it started to pill when I used my fingers. So, if you use Buffet, keep that in mind when applying this foundation- it didn’t pill when I used a sponge.

    Wearability

    To test the foundation, I didn’t powder my t-zone to see how well it held up. It set to a nice, smooth finish. It started breaking up and getting shiny after the 2nd hour on my chin and around and on my nose. My skin isn’t very oily, so if you do have oily skin, you should definitely powder your t-zone.

    sss
    Shade 2.0N

    Number and Letter Meanings for the Shades

    The shades range from very fair to deep: very fair to light (1.0-1.2), light medium to medium (2.0-2.1), medium dark to deep (3.0-3.3). Each shade is followed by a letter to indicate the undertone: Neutral (N), Pink (P), Yellow (Y), Red (R). They also have three shades that have a second letter: Silver (S) indicates silver highlights, and Gold (G) indicates gold highlights. For example NS listed below is Neutral undertones with Silver highlights and YG is Yellow undertones with Gold highlights. The S and G shades “use natural-looking and exceptionally fine dispersions of metallic effect pigments for added highlight,” and the description on The Ordinary’s website says they plan to “introduce individual enhancers and highlighters in the near future to customize all shades.”

    swatchpopup

    Shade Range

    N P Y R NS YG
    1.0 Very Fair x x x
    1.1 Fair x x
    1.2 Light x x x x
    2.0 Light Medium x x x
    2.1 Medium x x
    3.0 Medium Dark x x
    3.1 Dark x x
    3.2 Deep x x
    3.3 Very Deep x

    RATING: 4/5

    I love that it comes in a pump and it’s super affordable. It covered up redness around my nose and chin really well. I think I would prefer a foundation that gives a more luminous finish, but I can always add something to it to give it a pop (check out my beauty hack using the white/silver ‘concealer’ from the Coastal Scents Eclipse Palette). You definitely can’t go wrong with this foundation’s price.

    Love,

    jen

  • Bobbi Brown Skin Foundation Stick vs. Maybelline Fit Me Shine-Free + Balance Stick Foundation

    This or That | Bobbi Brown Skin Foundation Stick vs. Maybelline Fit Me Shine-Free + Balance Stick Foundation

    Hi Everyone!

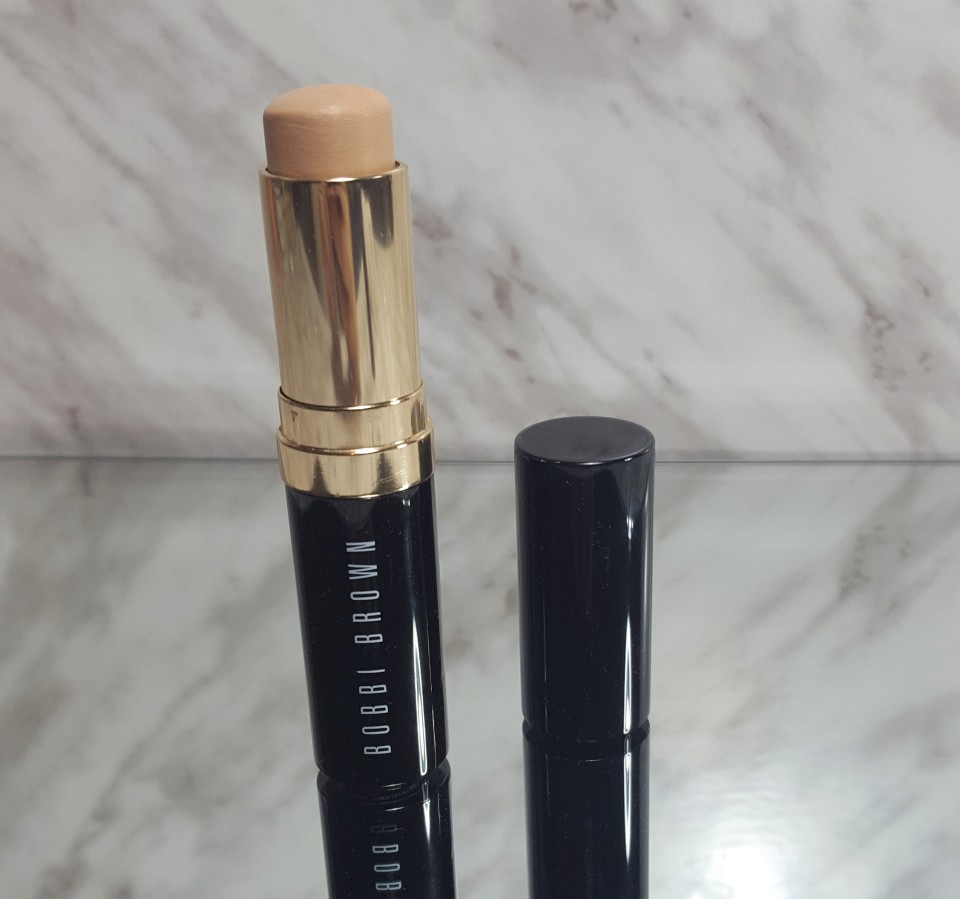
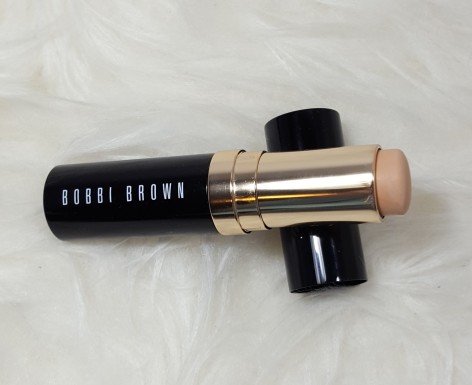
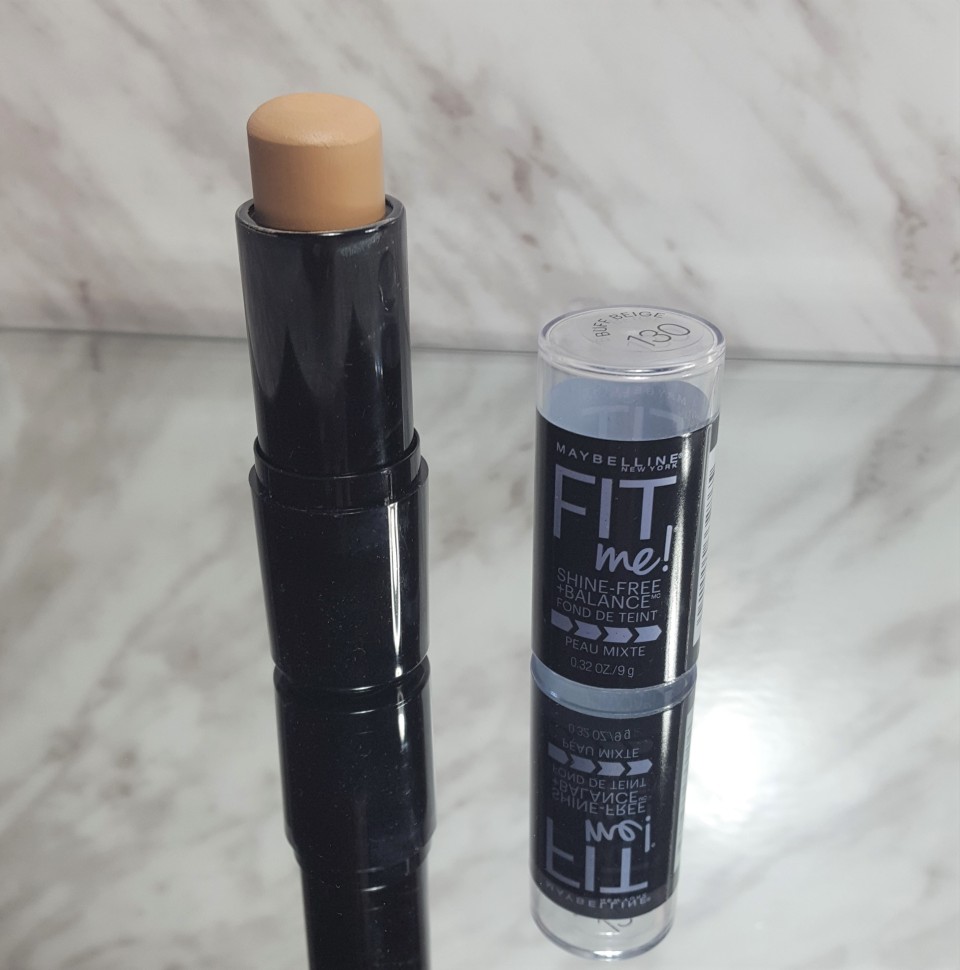
    Today, I’m comparing two stick foundations: Bobbi Brown’s Skin Foundation Stick and Maybelline’s Fit Me Shine-Free + Balance Stick Foundation. The Maybelline is obviously a lot cheaper than the Bobbi Brown and normally I would consider it a dupe, but the Bobbi Brown claims to have a natural, skin-like finish while the Maybelline stick has a natural matte finish and an anti-shine powder core that helps to mattify. For this reason, I am doing a This or That comparison instead of considering Maybelline’s stick a dupe for the Bobbi Brown one.

    20180711_195145

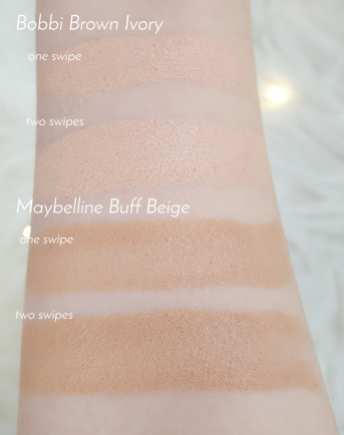
    Bobbi Brown Skin Foundation Stick in Ivory 0.75 – I got this at the MAC warehouse sale in September. They didn’t have a lot of shades left, I swatched it in the warehouse and it looked pretty close, turns out I was wrong. It is way too light and I need to go up a few shades.

    Update: They’ve changed the corresponding numbers of the shades. I don’t know if they’ve reformulated, but I’m assuming Ivory is still the same shade. The corresponding number has changed from 0.75 to C-024.

    media-20180202bbDesigned to look and feel like skin, this award-winning foundation is formulated with a unique transparent base and skin tone correct pigments for the most natural-looking, skin-like finish. A Bobbi Brown original, the innovative formula features Smart Technology for targeted moisturization or oil control depending on what skin needs. Delivers medium to full coverage and comes in a convenient swivel-up stick for at home and on-the-go application.

    20180711_195159

    Maybelline Fit Me Shine-Free + Balance Stick Foundation in 130 Buff Beige – I had the liquid Fit Me foundation in 130 Buff Beige, so I decided to get the stick in the same shade. Even though the liquid is a bit too dark/pink for me, there is a smaller shade selection in the stick foundations.

    media-20180202dfgd

    This lightweight gel foundation has an exclusive anti-shine powder core that instantly dissolves excess oil. Pores look minimized and skin stays shine-free for ten hours. This oil-absorbing foundation stick goes on creamy and blends into a natural matte finish. Medium coverage. Dermatologist tested. Allergy tested. Non-comedogenic. Suitable for sensitive skin. Fragrance-free.

    media-20180203ge.png

    I used my Make Up For Ever Step 1 Hydrating Primer and I didn’t apply any powder to test the wearability. Both of the sticks set to a velvety smooth finish. If you get an oily t-zone, I suggest powdering because both foundations started to break up on my forehead and chin, and my nose was super shiny by the second hour.

    Both foundations are buttery and easily glide on your skin. The Bobbi Brown covered up more of the redness around my nose, but still gave a natural, skin-looking finish. The Maybelline stick didn’t cover up as much redness and I could still see blemishes coming through, but a good concealer can easily fix that.

    WINNER (Higher Coverage, Natural Finish): Bobbi Brown Skin Foundation Stick

    WINNER (More Budget-Friendly, Natural Matte Finish): Maybelline Fit Me Shine-Free Balance Stick Foundation

    The Bobbi Brown stick has a more natural finish, yet offers more coverage than the Maybelline stick. The Bobbi Brown stick is also more buildable which makes sense because it claims to offer medium-full coverage while the Maybelline stick says medium coverage. The Maybelline stick evened out my skin tone, but didn’t cover up dark spots from blemishes.

    I think the Maybelline is a good everyday foundation for those who just want a natural matte finish and you can pair it with a good concealer (Maybelline’s Fit Me Concealer is a great drugstore option if you can find a match for your skin tone). I think it would also be good for summer because it looks natural, but mattifies at the same time. Since the Bobbi Brown stick is more expensive, I would save it for evenings (dinners or special occasions) because it did give a very beautiful finish.

    Have you tried stick foundations? What are your fave brands?

    Love,
    jen

  • the ordinary buffet

    First Impressions with The Ordinary “Buffet” Multi-Technology Peptide Serum

    Hi Everyone!

    As you all know, the Canadian brand, The Ordinary, has become really popular over the last year for it’s amazing skincare at even better prices. My sister bought me the ‘Buffet’ because it’s usually sold out so she grabbed it when she got the chance. I had no idea which ones to try, but I do want to try the Salicylic Acid and Hyaluronic Acid when I get a chance. She also bought me the Natural Moisturizing Factors + HA which I will write a first impressions once I’ve tried it out.

    The Ordinary is known for being super affordable and the fact that their products don’t add any fillers or misleading ingredients to their skincare.

    media-20180129wwww

    “Buffet” Multi-Technology Peptide Serum comes in a 30 mL glass bottle with a dropper. Originally I was wondering what was the best way to apply it: drop onto my hands and then pat it onto my face? Once I opened it, I realized it was thicker than I thought. It has the viscosity of maple syrup (Canadian, not regular syrup like Mrs. Butterworth’s). So, I use the dropper to put three small drops on my forehead and cheeks (or one big drop on my forehead).

    media-20180129,jkjThe Ordinary’s website has a product description that has a whole lot of words I don’t understand and I’m sure a lot of people are on the same boat. So, I chose to go with the simple description on the Sephora website:

    Apply to the entire face in the AM and PM after cleaning.

    A multi-peptide serum with syn-ake, matrixyl synthe-6, matrixyl 3000, argirelox, hyaluronic acid, amino acids and bio-derivatives to target multiple signs of aging.

    media-20180129k88888

    RATING: 3/5

    Since I have acne prone skin, I prefer using serums and skincare that aren’t too thick. The more liquid the better for me or my skin gets a reaction. This is a good consistency for me and so far it hasn’t caused any reactions. I’ve been using this for about two weeks now- day and night. My face feels softer from using this and usually around my nose is dry, but since I’ve started using this, it hasn’t been dry. The one thing I don’t love about this is that it feels a bit tacky after applying and I don’t love the smell (it’s almost like a wet smell- like if you left out a wet towel for too long). It’s great for the price and the glass bottle will be useful once I’m done.

    AM– I apply it after waking up and washing my face with my morning cleanser.

    PM– I apply it after my shower. Usually I shower a few hours before bed, so it gives the serum time to absorb into my skin and then it’s not too tacky when I go to bed.

    I tried using this under The Ordinary’s Serum Foundation (read my First Impressions Review). I applied the Buffet serum, then used one of my smoothing primers and applied the foundation with my fingers. The serum started to pill (when it balls up and resembles dry skin peeling off). I know it was the serum because I’ve used the foundation and the primer before and they’ve never pilled. The serum didn’t pill when I used a sponge to apply my foundation. Obviously, this makes sense since you dab/tap your face with a sponge, but you rub foundation in when you use your fingers. I prefer that I have no chance of pilling when applying my foundation, so I prefer to use the Buffet on days where I’m not wearing makeup or just for night time.

    Have you tried products from The Ordinary? What are your faves?

    Love,

    jen

  • the body shop all-in-one bb cream colour adapting cream

    Review | The Body Shop Colour Adapting BB Cream

    Hi Everyone!

    In my search for BB and CC Creams, I came across the Erborian CC Creme High Definition Radiance Face Cream. I thought it was so cool because then you don’t have to get a horrible colour match from a store (where you always get one that’s too light because you’re under all these bright lights instead of natural sunlight). Of course, it’s popular and it’s hard to get in Canada. They have the Erborian Pink Perfect Creme at Sephora for $51. It has a floral scent which I’m not a fan of and I’m sure the CC Creme also has a similar scent. So I looked to see if any other brands had a colour-adapting CC Cream and I found The Body Shop’s All-In-One BB Cream- Colour Adapting Tinted Cream. It comes in 5 shades and it’s half the price of the Erborian one. I chose the shade 01 Lighter Skin Tones. It has the typical BB/CC Cream scent. When I got it, it was $23 CAD. Right now they’re having a sitewide 40% deal, so it’s $13.80 at the moment.

    media-20180131gbrf.jpg

    When you’ve got no time to spare, our award-winning All-in-One BB Cream is a must-have beauty product for super-speedy results. Enriched with 24hr hydration, our hardworking, multi-tasking BB cream does it all, leaving your skin gloriously glowing and (almost) picture perfect. Pigment-filled capsules burst when applied to the skin, releasing the colour inside. Just blend for a perfect match and an even, undetectable finish.

    • Non-clogging
    • Offers light to medium coverage
    • Illuminates and evens appearance of skin tone
    • Enriched with Community Trade organic aloe vera

    Capturerrr.PNG

    As you can see in the pic on the right, the bb cream is white with little specks (the pigment-capsules that burst when you apply it).

    I don’t know about the 24 hour hydration because no one would be wearing it that long. It’s definitely light-medium coverage, but it gives your skin a nice, dewy finish. I add a bit of powder on my t-zone so that I don’t look shiny (keep in mind that I have normal/dry skin). I don’t know how well this would perform on oily skin.

    RATING: 5/5

    I really like it for days where I don’t want to put on a full face of makeup, but I want to even out my skin. I love how it has a natural finish and it doesn’t FEEL overly oily, but it can make you LOOK shiny if you don’t powder.

    What are your fave BB/CC Creams?

    Love,

    jen

  • Worth It? | Eyeshadow Shields

    Hi Everyone!

    media-20180125df

    This first impressions review is for a no-name brand of eyeshadow shields. I have not tried Shadow Shields or any other favourite eyeshadow shield. I was at Winners a while back and I picked up some eyeshadow shields for $3.99 CAD (pack of 25). I think the brand is La Soie, and the product is Color Guard. It’s such an unknown brand that I couldn’t find them online.

    To Apply: Remove only the top corner of paper and apply directly below the lower lash line to catch loose powder. For a stronger hold, remove the entire back strip then apply to skin.

    Use as an eyeliner stencil for straight lines or use as a guard to keep lip color within the lines.

    Everyone has a different strategy for applying their makeup. Some people do their eyes first, while others do their face first. For me, it depends on what type of eye I’m going for. If I’m doing a smokey eye or sparkly eye, it’s better if I do eyes first. If I’m doing a more natural everyday eye, I do it after my face makeup.Captureasxs

    I don’t know if name brand ones are less sticky, but I would definitely not recommend taking off the whole back strip. Even if you just peel off the top strip, it’s incredibly sticky and pulls on your skin. Since there is adhesive on these eyeshadow shields, I wouldn’t put on foundation or concealer until after doing eyes. Just to test it out, I tried using them after applying concealer and it took off my concealer and left a sticky residue. The glue adheres too well and therefore would be bad to use under your eyes where the skin is so delicate. Also, after I remove the shields, sometimes I like to blend it out so the line isn’t too harsh, but it leaves a sticky residue and therefore makes a void when I try to blend the shadow.

    They claim that it’s good for keeping lip colour in the lines, but I would much rather spend time carefully applying lip liner or lipstick than cutting these to be the perfect shape for my lips.

    RATING: 1/5

    If you love doing winged liner or a smokey eye, eyeshadow shields might be worth it for you, but make sure to get the name brand ones. I think tape can work just as well and you probably have tape lying around your house somewhere.

    These shields did help me get a nice winged liner, but it’s hard to position them perfectly so that your wings are even. I don’t think I would try actual Shadow Shields because they’re a bit pricey and I’d rather use tape instead. I am just a novice at doing winged liner because I prefer using kohl eyeliners and I can also never get the wings to match (one is always higher or longer). I prefer to smoke out a black/brown eyeshadow instead of doing a wing. I’m always practising my wings at home though.

    Have you used eyeshadow shields? What are your thoughts on them?

    Love,

    jen

  • garnier fructis 1 minute hair mask papaya extract

    Review | Garnier Damage Repairing Treat 1 Minute Hair Mask + Papaya Extract

    Hi Everyone!

    I was sent the Garnier Damage Repairing Treat 1 Minute Hair Mask + Papaya Extract for testing purposes by GlamSense. The following review is my honest opinion. I was sent this product for free, but they didn’t ask me to write the review on my blog.

    As you may have seen in a previous post, I wrote about the Grow Strong Hair Mask by Garnier. I really like the Grow Strong mask, it makes my hair super smooth and shiny. This papaya 1 minute hair mask is the same, it made my hair super shiny and quite smooth. The 1 minute hair mask line is vegan. Because it’s very natural, I found that it didn’t make my hair as smooth as the Grow Strong mask. Also, I prefer the Grow Strong’s packaging because you squeeze the product out and it’s more hygienic. The 1 minute masks come in tubs and I prefer not to stick my hand in a tub. Since it’s vegan, it’s easier to tell if the product has gone bad in a tub instead of a bottle, so I understand why it’s packaged that way.

    They also have 1-minute masks with Avocado (Smoothing), Coconut (Nourishing), Banana (Strengthening) and Goji (Colour Vibrancy) Extracts. I think I would like the avocado or coconut one since my hair isn’t damaged. I’m not a huge fan of papaya, but this mask smells pretty good. In terms of appearance, the Grow Strong Mask looks like a conditioner, whereas this one looks like Danone Yogurt (without the fruit chunks).

    ly.PNG

    In 1 minute, indulge your hair in a nourishing treat with 98% naturally derived ingredients*. Damage Repairing Treat 1 Minute Hair Mask + Papaya Extract helps you get soft, smooth & damage repaired hair. No weigh down, no silicones, no parabens, and no artificial colorants.

    * We consider an ingredient to be naturally derived if it is unchanged from its natural state or has undergone processing yet still retains greater than 50% of its molecular structure from its original plant or mineral source. This formula consists of 98% naturally derived ingredients. The remaining ingredients constitute 2% of the formula to ensure its sensoriality and preservation.

    You can use the mask three different ways:

    1. As a mask: After shampoo, apply onto wet hair and leave on for 1 minute. Rinse.
    2. As a conditioner: After shampoo, apply to hair from root to tip. Rinse.
    3. As a leave-in: Apply on damp and damaged hair for intense repair.

    I only used it as a mask and conditioner because my hair isn’t damaged enough to need it as a leave-in. I think it would feel kind of slimy as a leave-in though.

    As a mask, it made my hair soft and I had no tangles when combing my hair. It also looked really shiny, but it was almost too shiny because it made it look oily at the roots.

    As a conditioner, it made my hair soft, but it didn’t look as shiny for some reason.

    RATING: 4/5

    It smells good and made my hair soft, but this wasn’t the right mask for my hair. I would definitely be open to trying the Avocado or Coconut one, I’m not sure if I’d like the smell of the Banana one.

    Have you used hair masks? What are your faves?

    Love,

    jen

  • Review | Garnier Grow Strong Fortifying Mask for Hair

    Hi Everyone!

    I first used a hair mask a few years ago when I got one in a TopBox. I saw this one on clearance at Rexall for less than $5. I thought I’d give it a try.

    media-20180117h.jpgGarnier Grow Strong Fortifying Mask

    Hair is almost entirely made up of protein, which gives hair its strength. Paraben-free Fructis formulas with Active Fruit Protein™, an exclusive combination of citrus protein, Vitamins B3 & B6, fruit & plant-derived extracts and strengthening conditioners, are designed for healthier, stronger hair.

    Concentrated yet lightweight Fructis Grow Strong Fortifying Mask, with Apple Extract and Ceramide, injects strength deep into hair to fortify from root to tip.

    Directions: After using shampoo, you apply the hair mask from root to tip and leave it in for 3-5 minutes. Then rinse it out.

    RATING: 4/5

    It makes my hair feel super smooth and when I dry my hair, I never have tangles when I’m combing my hair. I have thick hair to begin with so I don’t know for sure if it’s making my hair stronger, but I’ve dyed my hair a few times and this mask makes my hair soft. I would love to try other hair masks by Garnier. It’s not my favourite smell, but it’s not the worst hair product I’ve used.

    Check out my review for the Garnier 1 Minute Hair Mask + Papaya Extract!

    Have you ever used a hair mask? What are your faves?

    Love,

    jen

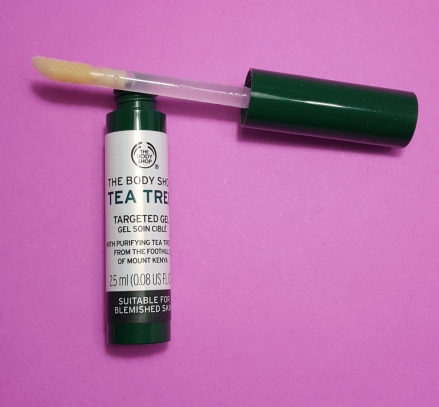
  • Review | The Body Shop Tea Tree Oil Targeted Gel Blemish Stick

    Hi Everyone!

    I read that tea tree products are good for acne-prone skin, so I thought I’d try the products from The Body Shop since they always have those specials (buy 2 or 3 and get 1 or 2 free). I decided to try something small just in case my skin reacted to the tea tree oil, so I got the Tea Tree Oil Targeted Gel Blemish Stick.

    Jennifer Catherine (C) titles(5)

    I use the stick when I feel a pimple coming or after it’s already popped up. The spot treatment works the same way as the Kate Somerville EradiKate. It dries out the blemish without drying out the surrounding skin. I think I like it better than the EradiKate because it can’t be too good for your face to always put sulfur on it whenever you have a breakout.

    media-20180116dOur Tea Tree Targeted Gel is designed for on-the-go targeted care. Enriched with organic Community Trade tea tree oil, our blemish stick is ideal for blemished skin. With a handbag-friendly wand-applicator, this quick drying gel can be applied directly onto skin, to see you through any skin emergency, mess-free.

    • A handbag essential
    • Ideal for blemished skin
    • Soothes and instantly cools targeted area without over-drying skin
    • Gives clearer-looking skin

    I’ve been using it whenever I get hormonal acne…you know, the kind that hurts, but it doesn’t have a whitehead. I used it on three pimples (two on my chin and one under my nose) that I got recently and it reduced the size of all of them, and dried two of the pimples out and brought the whitehead to the surface. All three of the pimples were quite painful, and after using the blemish stick, the pain went away. The one under my nose hurts if I accidentally touch it, but now at least it doesn’t hurt when I move my face.

    Even though it says “handbag essential,” I don’t think I’d ever use it on the go because it has a very strong smell. It’s a bit medicinal (not sure what tea tree oil actually smells like) and reminds me of Chinese herbal medicine, although it does beat the sulfur smell from the EradiKate.

    After seeing how well the blemish stick performed, I’m definitely interested in trying out the other tea tree oil products that The Body Shop sells: toner, cleansers, etc. I know that the blemish stick is probably more potent since it’s a spot treatment, but maybe the toners and cleansers can help to prevent breakouts.

    RATING: 4/5

    It’s a bit expensive for a small tube, but it works really well for me. Also, I wish it came packaged differently. Maybe a squeeze bottle or something similar to the EradiKate bottle so that I can use a clean q-tip each time I use it. It can’t be too hygienic to use the sponge tip applicator on a pimple and then put it back into the container.

    Check out my review for The Body Shop’s Tea Tree Oil Anti-Imperfection Daily Solution

    What products do you use for acne?

    Love,

    jen

  • Review | Bumble and bumble Soft Black Hair Powder

    Hi Everyone!

    I bought a two-pack of the Bumble and bumble Soft Black Hair Powder at the MAC Warehouse Sale and just got around to trying it out. It was $25 for 2 cans, regular price at Sephora is $49.50 CAD for 4.4 oz. I’ve been reading about this to get an exact idea of what this is because nowhere on the can does it say that it’s a dry shampoo, but the exact definition of a dry shampoo is “a dry substance that cleans your hair without the use of water. Dry shampoo works by absorbing oil from your scalp and hair, and making it look and feel freshly washed again” (www.womansday.com, 2011). Also, when you click ‘Dry Shampoo’ on the Bumble and bumble website, the Blondish and Brownish hair powders come up on the page.

    media-20180109t.jpg

    A tinted, dry cleanser for dark, inky brown, and black hair colors.

    What it does:
    This hair cleanser absorbs excess oil and adds volume. Use it to extend the life of a blow-dry and leave hair with a matte texture.

    The tint easily washes off clothes or fingers, but that also means it’s easily transferable. If you accidentally touch your head or lie on a pillow, it will probably come off.

    It smells likes the stuff you spray on your boots to waterproof them. This product wasn’t for me. If I’m going to spend $50 for a dry shampoo or powder (which I wouldn’t), I want it to smell nicer than this hair powder does.  I don’t even spend half that for my regular shampoo. Since it’s in an aerosol can, it starts off as a liquid like spray paint, but then you let it dry and it’s more powder-like. After letting it dry though, it has a sticky hairspray feeling. Also, the fact that it sprays means you have to protect your clothes and don’t get too close to any walls in your bathroom or wherever you’re spraying it. Other dry shampoos that are cheaper smell a lot better than this. I’d rather use the amika perk up dry shampoo which smells amazing and it’s $28.60 CAD for 5.3 oz)

    RATING: 1/5

    I’ve only ever tried aerosolized dry shampoos, I’ve never used a powder one, but I think if I were to try a powder shampoo, I would get Cake’s The All Powderful Tinted Dry Shampoo (Dark). It comes in powder form in a regular bottle so it’s not bad for the environment to dispose of like aerosol cans. Plus, you’d be able to take it on a plane.

    What are your fave dry shampoos? Have you used Bumble and bumble products?

    Love,

    jen

  • Review | Gosh Cosmetics Click’N Conceal Pen

    Hi Everyone!

    When I was at Shoppers Drug Mart a few months ago, they were having a 50% off sale for GOSH Cosmetics products. There wasn’t a lot left, but they did have a click concealer pen in light and I thought I’d try it. Since it’s a click pen, I figured the formula would be more runny than the usual concealer you get in the wands and I was right. The consistency is similar to the YSL Touche Eclat pen. I can’t say whether or not this is a dupe for the YSL Touche Eclat, but I really like the Gosh Cosmetics pen. At first, I thought the shade would be too peachy for me, but it actually helps concealer the darkness under and around my eyes. One you blend it, it somehow looks lighter than when you dab it onto your skin.

    I like that it’s not drying- after I apply concealer under my eyes, it’s not cakey or heavy. It has a natural finish and it’s a perfect consistency for under the eyes. I also love Rimmel’s Wake Me Up Concealer for under eyes too (I use 030 Classic Beige, but think I could go a shade lighter).

    Gosh Cosmetics Click’N Conceal in 01 Light

    CLICK`N CONCEAL is a high quality concealer with a smooth and soft texture. The brush will easily brush away imperfections and spots on your skin leaving a refreshed and flawless skin. Ideal for hydrating and protecting the delicate skin around the eyes. Reduces dark circles & puffiness. No perfume, no parabens.

    I swatched it on my hand and then the right side is after it’s blended.

    gosh cosmetics

    Below is before and after I applied it. You can see that before applying it, I have a bit of darkness around my eyes, but once I applied the concealer, it brightened up the area. I primed my under eyes with Smashbox’s Photo Finish Hydrating Under Eye Primer.

    RATING: 4/5

    I dock a point because it’s not very easy to find, especially now that Shoppers is having a going out of stock sale for it. I found 2 more at another Shoppers and stocked up.

    What’s your favourite concealer for under the eyes? I know Maybelline’s Age Rewind and Tarte Shape Tape is a fave for many.

    Love,

    jen

  • Review | The Face Shop Clean Face Clear Away Spot Treatment

    Hi Everyone!

    If you have acne-prone skin like I do, you probably know about Kate Somerville’s EradiKate Acne Spot Treatment and Mario Badescu’s Drying Lotion. Last year, I bought The Face Shop’s Clean Face Clear Away Spot Treatment thinking it was a dupe, but it contains different ingredients. The EradiKate and Drying Lotion contain sulfur, whereas the Clean Face Clear Away Spot contains salicylic acid and tea tree extract.

    JC titles for blog

    It works in the same way as the Drying Lotion and EradiKate, you use a q-tip to pick up the sediment at the bottom and dab it onto your problem areas. Because it doesn’t have sulfur, the smell isn’t nearly as strong, it smells more like rubbing alcohol and tea tree oil.

    I bought the acne treatment for $17 CAD for 18 mL (at the time of purchase last year, price may have gone up).

    A special care product that instantly soothes and controls breakouts

    Contains Tea Tree Extract that soothes the acne and purify the skin, and Salicylic Acid that removes dead skin cells effectively

    Provides soothing effects and controls the excessive sebum production with Calamine Powder

    Prevents inflammation, pigmentation, and anti-aging concerns such as wrinkles and dehydration

    To compare, I have the EradiKate (I’ve never used the Mario Badescu Drying Lotion). I have acne-prone and sensitive skin, so my skin gets very dry from products that contain ingredients like benzoyl peroxide.

    I wouldn’t suggest using this overnight because after a few minutes, it hardens and gets very flaky. If your face makes the slightest movement, it will start to flake off.

    RATING: 4/5

    Obviously it doesn’t work as well as the EradiKate, but if you’re looking for something gentler than the EradiKate or Drying Lotion, this is a great alternative because of the salicylic acid.

    What acne treatments do you use?

    Love,

    jen

  • Dupe It Out | L’Oréal Voluminous Lash Paradise Mascara vs. Too Faced Better Than Sex Mascara

    Hi Everyone!

    Today, I’m comparing two best-selling mascaras: Too Faced Better Than Sex and L’Oréal Voluminous Lash Paradise Mascara. Better Than Sex retails for twice as much as the Lash Paradise. I wanted to write this review before the Better Than Sex mascara dried out. I think out of all mascaras I’ve owned, the Better Than Sex mascara is the quickest to dry out. Continue reading to find out which one I named the winner!

    Too Faced Better Than Sex Mascara – I’ve tried this several times and I just don’t love it. It dries out too quickly and I prefer cone-shaped wands.

    Experience a Mascara so amazing… It’s Better Than Sex! This unique collagen-fueled formula thickens, lengths, and curls after just one coat. Swipe on 3 coats for the most luscious, dramatic, volumized lashes possible!

    L’Oréal Voluminous Lash Paradise Mascara – This was a bit pricey for a L’Oréal mascara. Similar to the Better Than Sex, I just don’t like the wand.

    Take your lashes to paradise! Our 1st mascara for voluptuous volume & length. Soft wavy bristle brush holds maximum formula for a dramatic volumizing charge. 200+ bristles catch every lash for a full fringe effect. Smooth glide formula provides silky volume in one coat. Lashes are feathery soft to the touch.

    I’m going to start off by saying that I try not to pay more than $15 for mascara because I don’t want to spend that much on mascara when I’m going to be throwing it out in a few months (because three months is when you should throw out your mascara). I’d rather save on mascara and splurge on products for my base (foundation, primer, etc.). The high end mascaras that I do own are travel-sized ones that I got as rewards or in a kit.

    aaax
    Too Faced Better Than Sex (top), L’Oréal Lash Paradise (bottom)

    I think the Better Than Sex mascara has dried out a bit and there’s not as much mascara on the brush, whereas the Lash Paradise brush doesn’t look as hourglass-shaped because there is more mascara on the brush (I didn’t wipe off either brush to show you what they look like straight from the tube. When I applied them to test the two, I did have to wipe off some excess from the Lash Paradise.

    The first time I got the Too Faced mascara, I think it was dried out. It went on clumpy and my lashes weren’t curled. I prefer a tapered wand, the brushes on these two mascaras are hourglass-shaped. I wanted to see how smudge-proof the mascaras were, so I rubbed my finger across my lashes. The Better Than Sex mascara flaked onto my hand while the Lash Paradise didn’t. Both versions of mascara that I have are not waterproof, I just wanted to see how well they would do if I were to get caught in some rain. I sprayed my face with some face mist and blinked a few times, both mascaras smudged.

    I wouldn’t say either of these mascaras are on my top ten list, but if I had to choose a winner, it would be the Lash Paradise. When I tried the mascaras (one on each eye), the Lash Paradise held the curl of my lashes better. I do love L’Oréal mascara though, the Voluminous Original was one of the first mascaras I tried and I still love it. See my Best of 2017 post to see which four mascaras I liked best this year! I chose two high end ones and two drug store ones (one retails for $5.49).

    WINNER: L’Oréal Voluminous Lash Paradise Mascara

    What are your fave mascaras? Are the Too Faced Better Than Sex and the L’Oréal Voluminous Lash Paradise on your top ten?

    Love,

    jen

  • Smashbox Photo Finish Color Correcting Foundation Primer vs. Make Up For Ever Step 1 Skin Equalizer Primer (Redness Correcting)

    This or That | Smashbox Photo Finish Color Correcting Foundation Primer vs. Make Up For Ever Step 1 Skin Equalizer Primer (Redness Correcting)

    Hi Everyone!

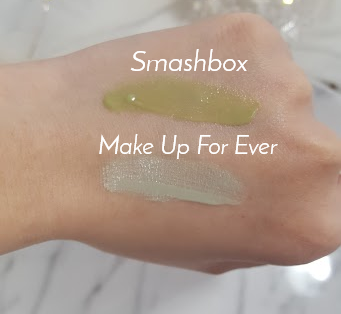
    Today, I’m comparing two high end colour correcting primers: Smashbox Photo Finish Color Correcting Foundation Primer- Adjust and Make Up For Ever Step 1 Skin Equalizer Primer- Redness Correcting Primer.

    I own the travel-sized Smashbox primer, but used the 1 oz price to compare it to the Make Up For Ever primer.

    media-20171218121212Smashbox Photo Finish Color Correcting Foundation Primer- Adjust

    Look less red! This green-toned primer color-corrects redness, blurs pores, evens skin tone & reduces the appearance of fine lines.

    media-2017121812Make Up For Ever Step 1 Skin Equalizer Primer- Redness Correcting Primer

    REDNESS CORRECTING PRIMER instantly neutralizes and evens out red tones for flawless foundation coverage. Green Spectraflex® pigments color correct redness and boost radiance while moisturizing agents provide hydration. Skin tone is evened out for a flawless makeup all day long.

    111224.png

    The Smashbox primer didn’t reduce any redness, when you blend it into your skin. It’s like they added a green tint to their silicone photo finish primer that blurs pores. The green sort of just moves around and doesn’t blend in as well.

    The Make Up For Ever primer has the consistency of a moisturizer/serum and when you blend it into your skin, it actually neutralizes redness. Although if you constantly have to cover up redness, I suggest investing in a colour correcting concealer instead of a primer.

    WINNER: Make Up For Ever Step 1 Skin Equalizer Primer- Redness Correcting Primer

    If you’re looking at which primer actually conceals redness, Make Up For Ever is the winner. If you prefer Smashbox Primers, I would just buy the Photo Finish one and then use a colour correcting concealer on top of it because when I was blending the swatches on my hand, I was just moving green chunks around on my hand.

    I get red on and around my nose and chin, and sometimes the Make Up For Ever primer doesn’t cover it. I think if you get very mild redness, then the primer is okay, but if you constantly need to cover up redness, I think it’s best to invest in a colour correcting concealer and just get a regular face primer. I absolutely love the two other Step 1 Skin Equalizer Primers that I’ve tried: smoothing (For Large Pores & Fine Lines) and hydrating (Universal formula for normal skin with occasional dryness). They have a light scent to them, like a nice perfume. Make Up For Ever has four natural finish primers: hydrating, redness correcting, nourishing and smoothing. They also sell a mattifying one and radiant finish colour correcting primers (blue, pink, yellow, peach, caramel and mauve).

    Some recommendations for a colour correcting concealer: Urban Decay’s Naked Skin Color Correcting Fluid and the NYX HD Photogenic Concealer Wand- Green. The Urban Decay and NYX ones are similar, the NYX one is a dupe for the Urban Decay one in terms of the type of product, but the shades of green are very different and the NYX one is thicker. Even from my swatches below, you can see that the NYX one has absorbed into my skin a bit and the Urban Decay one is more liquid.

    media-20171218

    NYX HD Photogenic Concealer Wand- Green

    Urban Decay’s Naked Skin Color Correcting Fluid

    What are your fave colour correcting products?

    Love,

    jen